The NetMan Data Conversion utility converts data from NetMan 4 to the NetMan 5 format and imports it into the new NetMan 5 database:
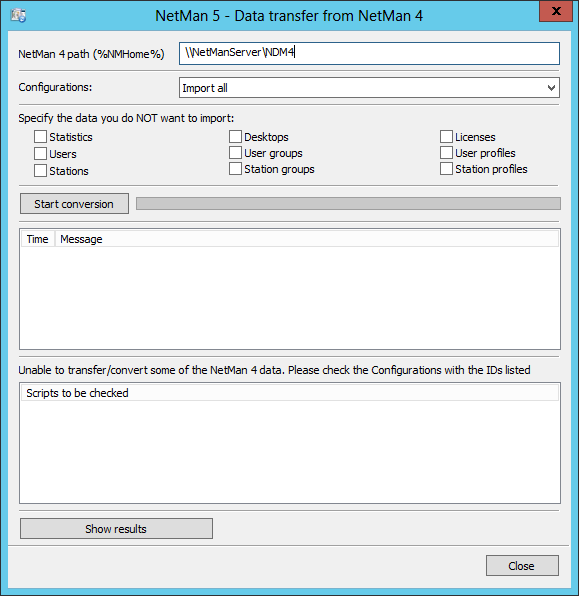
NetMan 4 path (%NMHome%). Path to your NetMan 4 share, e.g. \\NetMan4Server\NetMan4.
Configurations: Defines whether and how NetMan 4 Configurations are imported:
•Import all. All Configurations will be converted and imported.
•Import and add 'UPD-' to Script ID. All Configurations will be converted and imported, with "UPD-" (for "update") added to their Script IDs.
•Do not import. Your NetMan 4 Configurations will not be added to NetMan 5.
Specify the data you do NOT want to import. The data types you select here will not be imported. If you have specified that Configurations will not be imported, then you will not be able to import Desktops either. Desktops require their original Configurations for conversion and import.
Start conversion. Starts the conversion and import of the specified data. The progress bar next to the button shows the progress, and the list below that shows a realtime log of the import operation.
Scripts to be checked. The list shows the IDs of Configurations for which not all data could be converted. Please check these Configurations; you might need to change rights or other settings to enable conversion/import.
Show results. Opens the log file from the conversion/import in an editor.
Importing data
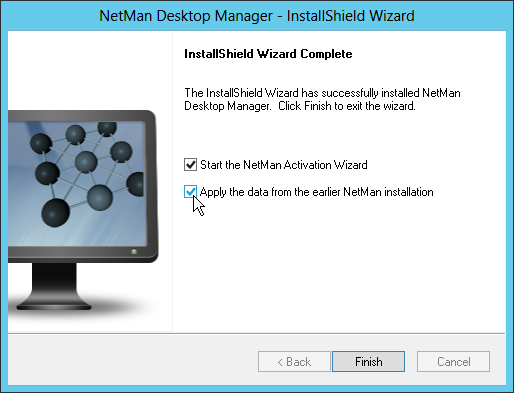
1. When the installation of the server components is finished, the last dialog contains the option: Apply the data from the earlier NetMan installation. Activate this option to convert and import NetMan 4 data:
2. In the Select folder dialog, enter the path to your NetMan 4 installation.
3. The installation program is closed, and the NetMan Data Conversion program opens. In the Configurations field, specify whether you wish to import Configurations and have them converted to NetMan Scripts. You can also choose to have the prefix "UPD-" added to the new Script IDs.
4. In the Specify the data you do NOT want to import field, select the data you do not wish to import. If your setting in the Configurations field specifies that Configurations will not be imported, then you cannot import Desktops. To import Desktops, their original Configurations must also be imported. That is why the Desktop option is automatically selected when you choose not to import Configurations. Depending on your particular use of NetMan, you might find it preferable not to import statistical data (usage data), as this step may take quite a long time.
5. Click on Start conversion. Your data are imported.
![]() The Scripts to be checked list shows the Script IDs of Configurations for which not all data from the original Configurations could be imported. These have to be checked individually, and might need to be modified. To see details on the import operation, click on Show results; this opens the log file in an editor.
The Scripts to be checked list shows the Script IDs of Configurations for which not all data from the original Configurations could be imported. These have to be checked individually, and might need to be modified. To see details on the import operation, click on Show results; this opens the log file in an editor.