The primary NetMan Desktop Manager database server is configured when you configure the replica set. Prerequisite is that your secondary servers have already been installed or configured. For details on performing a secondary installation on a blank server, see "Secondary Installation". For details on reconfiguring an existing server for use as a secondary server, see "Configure Secondary Servers". Configure the primary server in the NetMan System Settings:
1. In the NetMan System Settings, open the DB Configuration page.
2. On the DB Configuration page, click on Set up Replication.
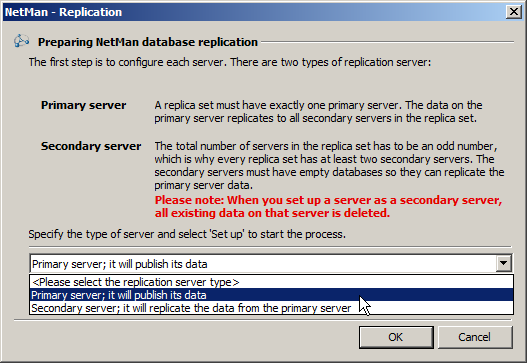
3. The replication setup program helps you prepare the server for its role in the replica set. Select Primary server; it will publish its data and Click OK:
4. Click OK to acknowledge the warning that configuration data will be deleted.
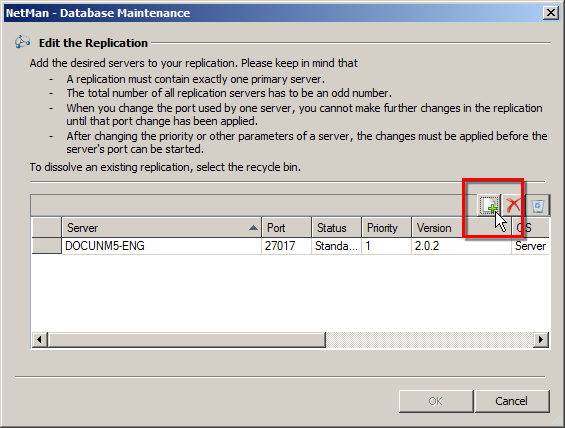
5. On the Edit the Replication page, the primary server you are currently using is already listed in the replica set. Click on the Add button above the list to add the secondary servers to the replica set:
6. In the Add database server dialog, enter the name of a secondary NetMan server under Secondary server and click OK to confirm:
![]() If you are not using the database port given as the default during installation, you need to enter the database port in addition to the name of the server (<timeserver:databaseport>).
If you are not using the database port given as the default during installation, you need to enter the database port in addition to the name of the server (<timeserver:databaseport>).
Repeat Step 6 to add the other secondary servers as well.
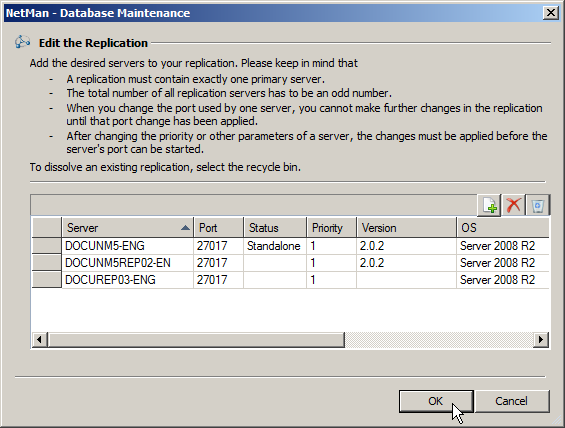
7. The list now shows all of the servers that belong to the replica set:
![]() The primary NetMan Desktop Manager server is marked Standalone in the Status column until configuration of the replication system is complete.
The primary NetMan Desktop Manager server is marked Standalone in the Status column until configuration of the replication system is complete.
8. Click on the OK button. The configuration is executed:
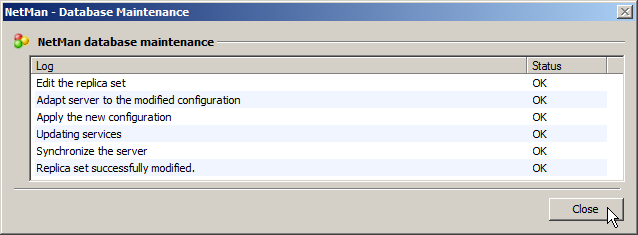
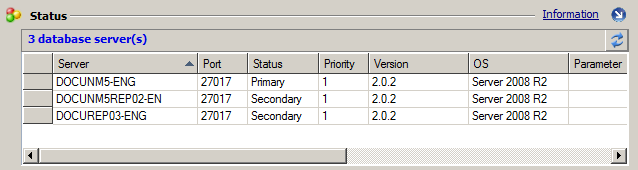
When all tasks listed in the database maintenance log are marked "OK" in the Status column, click on Close to conclude the configuration of the primary NetMan Desktop Manager server. The server list now shows the correct status of all servers:
Now you can modify the priority of each server, shown in the Priority column:
Some of the values in the server table can be modified. For example, you can modify the priority of a server. A secondary server that has a higher priority value than another is more likely to be made the next primary server in the event of primary server failure. When the replica set is initially set up, all servers have a priority value of 1. For installation of the replication system, it is generally advisable to leave the priority values unchanged. When all servers have a priority of 1, all servers have the same chance of becoming primary server. As long as the priority values are not changed and there is no server failure, the server you initially configured as the primary server remains the primary server. If this server fails, another server takes over. In a system where all servers have the same priority, the new primary server remains the primary server until such time as it also fails. If you want the original primary server to be made primary server once again when it is back online, give it a higher priority value. As another example of modified priorities, you might assign a lower priority to a lower-performance server, so that it will not be made to take over as primary server unless there is no higher-performance server that can do so. We recommend configuring the entire replication system first, and then setting priorities in accordance with your requirements.