For testing purposes, NetMan Desktop Manager lets you create self-signed certificates that are only temporarily valid. When you use a self-signed certificate, the browser will report a certificate error repeatedly until the self-signed certificate is replaced by a certificate issued by an authority. That is why we recommend using this procedure only for testing. Self-signed certificates are created in the NetMan System Settings. Open the NetMan System Settings from the Windows Control Panel, under System and Security/H+H NetMan.
1. In the NetMan System Settings, select the NetMan Web Service page.
2. On the NetMan Web Service page, click on the Edit button under Certificates.
3. Select Create or request a new server certificate and confirm by clicking on Next.
4. On the Create a New Server Certificate page, enter all the data requested:
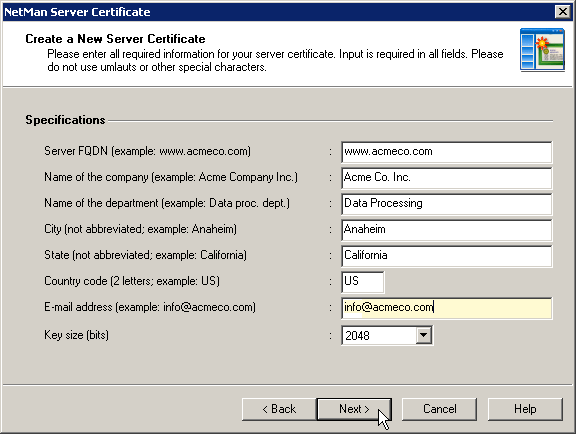
Server FQDN. Name of server on which NetMan Desktop Manager is installed. This name has to match the URL that is entered in the browser to access the Web Interface. If the name in the Active Directory domain was acmecompany.local, for example, and the server was called rz2, you would enter rz2.acmecompany.local as the FQDN.
Name of the company. Enter the name of your company or organization.
Name of the department. You can use this input to specify a particular department or section of your company or organization (for example, the data processing center).
City. Enter the name of the city in which your organization is located.
State. Enter the state in which your organization is located.
Country code. Enter the two-letter code for your country (see ISO 3166; for example, US for the United States, UK for the United Kingdom, DE for Germany, etc).
E-mail address. Enter the e-mail address to be used for contact.
Key size (bits). The key size for the encryption of the certificate.
5. Click on Next. On the next page, indicate whether you are creating a self-signed certificate or a request for a certificate from an official certificate authority. Under Type of certificate, select the Issue a self-signed certificate option.
6. To enter a date in the Valid until field, click on the Select button (...) to open a calendar.
7. Select the desired date and confirm with OK.
8. Under Password for the private key of the certificate enter any password for protecting the private key.
9.Click on Finish to create the certificate and integrate it in the web server. Your changes will not take effect until after you restart the NetMan web server.
![]() To restart the web server, open the NetMan Web Service page of the NetMan System Settings and click on Restart in the Ribbon.
To restart the web server, open the NetMan Web Service page of the NetMan System Settings and click on Restart in the Ribbon.
For details on all of the NetMan System Settings, see "NetMan System Settings". For details on requesting and integrating official certificates, see "Request and Import Official Certificates".