With the NetMan Client Distributor, NetMan Desktop Manager offers you an easy, uncomplicated option for distributing the NetMan Client throughout the entire network. This chapter describes the tasks you can execute with the NetMan Client Distributor:
•Select network detection method
•Check stations and install NetMan Client
The “Functions of NetMan Client Distributor“ section describes all functions of the NetMan Client Distributor at a glance.
Open the NetMan Client Distributor on the NetMan Desktop Manager server, using the NetMan Toolsdesktop shortcut.
Select network detection method
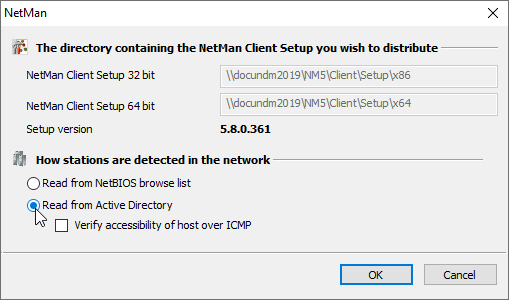
The NetMan Client Distributor distinguishes between two methods for detecting network stations: NetBIOS browsing and reading the Active Directory. In a pure AD environment, we recommend reading the AD. After installation, AD viewing is active in the Client Distributor.
1. To change the discovery method, open the Settings program (click on the toolbar button):
2. Select the desired discovery method and click OK:
Before you distribute the Client, you can configure its settings. By default, the settings configured for the Client on the NetMan Desktop Manager server are used. You may wish to have other settings configured in the distributed Client, however. For example, you might want to hide the Start program that is displayed in the Windows system tray. To do this, you need to modify the Client Setup before distribution.
1. Click on the Setup button in the ribbon to run the Settings program for the Client Setup:
2. In the Configuration dialog, you can configure such settings for the Client Setup as the host name and the communications port, or whether the Start program is displayed in the system tray.
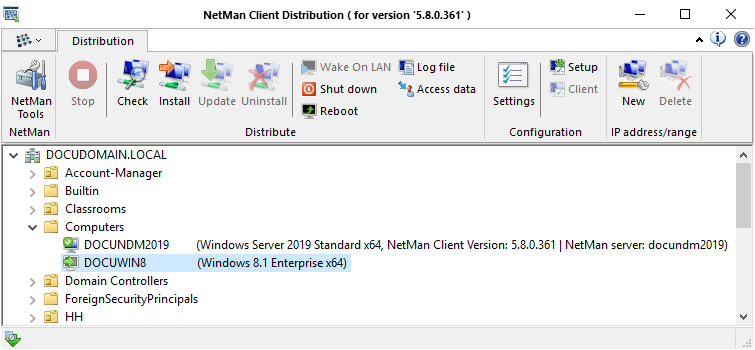
The Client Distributor program lets you check specific stations or entire OUs, for example to check the stations in a given department.
1. Select the desired station or OU.
2. In the ribbon, click the Check button: When this process has concluded successfully, icon(s) indicates the status of the station(s) checked.
The workstation icons indicate station status as follows:
|
Station not checked |
|
Station checked; a current version of NetMan Desktop Client is installed. |
|
Station check failed. |
|
The station is ready for installation of NetMan Desktop Client. |
|
Station needs to be restarted. |
3. In the ribbon, click Install to begin installation of the NetMan Client on the workstations:
The Client Distributor installs the NetMan Client in Silent mode.
![]() After installation, (another) user login is required before the NetMan Client can be launched.
After installation, (another) user login is required before the NetMan Client can be launched.
![]() You can also call the Check/Install functions from the shortcut menu (right-click).
You can also call the Check/Install functions from the shortcut menu (right-click).
A green dot on a blue workstation icon indicates that the client is already installed. In this case, the version number is shown in parentheses next to the workstation name , followed by the associated server. If the client version is out of date, click on Update to install the latest version.
The Uninstall command removes the NetMan Client from the selected station or OU.
You can reboot a workstation by clicking Reboot.
In a large network, you may find that some of your workstations' operating systems are missing from network browser list. These stations are not shown in the Client Distributor's NetBIOS View. That is why the NetMan Client Distributor offers the choice of rolling out the client software based on client IP address:
![]() The absence of stations in the NetMan Client Distributor display is not due to a defect in the program, but to the fact that the operating system's network browser is not entirely reliable in all network environments.
The absence of stations in the NetMan Client Distributor display is not due to a defect in the program, but to the fact that the operating system's network browser is not entirely reliable in all network environments.
1. To distribute the NetMan Client based on client IP addresses, click the New button in the IP address/range section of the ribbon.
2. In the dialog, in the IP address(es) field, enter the IP address or address range for the stations on which you wish to install the Client:
![]() In the IP address(es) field, enter either an IPv4 or IPv6 address. For IPv4 addresses, you can also specify an IP range. To do this, enter the first address to be included in the range, then a hyphen, and then the last address. IP address groups cannot be entered for IPv6 addresses.
In the IP address(es) field, enter either an IPv4 or IPv6 address. For IPv4 addresses, you can also specify an IP range. To do this, enter the first address to be included in the range, then a hyphen, and then the last address. IP address groups cannot be entered for IPv6 addresses.
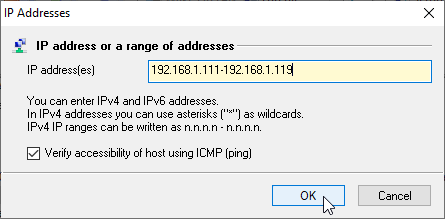
Select the Verify accessibility of host over ICMP option if you want to install the Client only on those stations that respond to an ICMP echo request (ping).
IP addresses and address ranges are displayed above the other stations and station groups, sorted by address. The functions for installing, updating and uninstalling operate in the same manner as for stations listed by name.
![]() Keep in mind that the NetMan Desktop Client Distributor program runs under your user account, and thus can access only those network resources in which you have access rights. For example, if you do not have permission to access the client stations' Admin$ shares and registries, you need run this program under a different account. The domain administrator account generally has the rights you need to access these resources. Once you launch the program, it will also need to access the client stations' Admin$ shares and registries. The Distributor cannot install the NetMan Client on stations on which the Admin$ share has been deactivated.
Keep in mind that the NetMan Desktop Client Distributor program runs under your user account, and thus can access only those network resources in which you have access rights. For example, if you do not have permission to access the client stations' Admin$ shares and registries, you need run this program under a different account. The domain administrator account generally has the rights you need to access these resources. Once you launch the program, it will also need to access the client stations' Admin$ shares and registries. The Distributor cannot install the NetMan Client on stations on which the Admin$ share has been deactivated.
![]() Firewall settings on your client stations might block access to the Admin$ share. Be sure to adjust the firewall settings as needed; for example, in the group policies.
Firewall settings on your client stations might block access to the Admin$ share. Be sure to adjust the firewall settings as needed; for example, in the group policies.
![]() If you do not have sufficient permissions in the network to run the "Check" or "Install" command, an error is written in a log file and the corresponding icons are displayed for the stations in question. The log file contains all messages; new messages are added at the end of the file.
If you do not have sufficient permissions in the network to run the "Check" or "Install" command, an error is written in a log file and the corresponding icons are displayed for the stations in question. The log file contains all messages; new messages are added at the end of the file.
1. In the ribbon, click the User ID button:
2. In the Access Data dialog, enter the login data to an account that has the required privileges: Next to Connect as, enter the user name and, next to Password, enter the associated password. The access data is saved until the Client Distributor is closed.
Functions of NetMan Client Distributor
Commands in the ribbon
NetMan Tools. Opens the NetMan Tools.
Stop. Stops the execution of all active tasks.
Check. Checks the marked stations.
Install. Installs the NetMan Client on the selected stations.
Update. Updates the NetMan Client on the selected stations to the current version.
Uninstall. Installs the NetMan Client on the selected stations.
Wake (on LAN). Wakes up the selected stations via Wake-on-LAN.
Shut down. Shuts down the selected stations.
Reboot. Restarts the selected stations.
Log file. Opens the log file with installation messages.
Access data. Allows you to enter access data with sufficient rights to perform Client Deployment functions on the selected stations.
Settings. Opens the settings of the NetMan Client Distributor.
Setup. Opens the settings of the NetMan Client setup.
Client. Opens the NetMan Client settings of the selected stations.
New. Creates a new IP range.
Delete. Deletes the selected IP ranges.
Context menu commands
Check. Checks the selected stations.
Install. Installs the NetMan Client on the selected stations.
Update. Updates the NetMan Client on the selected stations to the current version.
Uninstall. Uninstalls the NetMan Client on the selected stations.
Wake (on LAN). Wakes up the selected stations via Wake-on-LAN.
Shut down. Shuts down the selected stations.
Reboot. Restarts the selected stations.
Reset 'Reboot' state. Deletes the "Restart required" flag for selected stations.
IP address(es). Creates a new IP range.
Delete IP address(es). Deletes the selected IP ranges.
NetMan Client configuration. Opens the NetMan Client settings of the selected stations.
NetMan Client setup configuration. Opens the settings of the NetMan Client setup.
Access data. Allows you to enter access data with sufficient rights to perform Client Deployment functions on the selected stations.
Setup log file. Opens the log file with installation messages.
Program menu commands
NetMan Tools. Opens the NetMan Tools.
Stop. Stops the execution of all active tasks.
Distribute. Starts Client Distributor tasks:
•Check. Checks the selected stations.
•Install. Installs the NetMan Client on the selected stations.
•Update. Updates the NetMan Client on the selected stations to the current version.
•Uninstall. Uninstalls the NetMan Client on the selected stations.
Reload. Reloads the stations with the selected network detection method.
Settings. Opens the settings of the NetMan Client Distributor.
Utilities. Launches NetMan utilities.