This chapter explains how to install the server component of your NetMan Desktop Manager software.
![]() This chapter describes a standard installation of NetMan Desktop Manager. For details on setting up a secondary NetMan Desktop Manager installation for failover support, see "Secondary Installation".
This chapter describes a standard installation of NetMan Desktop Manager. For details on setting up a secondary NetMan Desktop Manager installation for failover support, see "Secondary Installation".
![]() We recommend reading the chapter entitled "Installation" and "System Requirements" for descriptions of the various possible installation scenarios and details on the installation requirements before beginning the installation.
We recommend reading the chapter entitled "Installation" and "System Requirements" for descriptions of the various possible installation scenarios and details on the installation requirements before beginning the installation.
Install NetMan Desktop Manager on the console your server.
![]() If you are installing NetMan Desktop Manager on a Session Host, the Session Host has to be in installation mode. You can either activate the Session Host before beginning installation, or install NetMan Desktop Manager using the Windows installation program (Control Panel/Programs/Install Application on Remote Desktop Server).
If you are installing NetMan Desktop Manager on a Session Host, the Session Host has to be in installation mode. You can either activate the Session Host before beginning installation, or install NetMan Desktop Manager using the Windows installation program (Control Panel/Programs/Install Application on Remote Desktop Server).
If you are installing from a CD, installation starts automatically when the CD is loaded. If installation not start automatically or if you downloaded the setup file, run the Setup.exe file on the CD or in your download folder.
![]() The NetMan Desktop Manager setup program will install the German language version if you are running your OS in German; otherwise, the English language version is installed.
The NetMan Desktop Manager setup program will install the German language version if you are running your OS in German; otherwise, the English language version is installed.
1. On the Setup home page, click Next to launch the Setup program.
2. Confirm the license agreement to continue.
3. Select the target path for the installation.
![]() We recommend using the default path.
We recommend using the default path.
4. Select Standard installation:
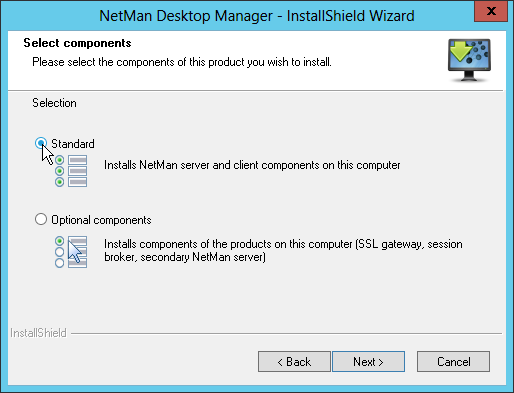
If you select "Optional components," Setup will offer to install components such as the SSL gateway or a secondary NetMan installation.
![]() The subsequent installation process may include a prompt to enter port numbers, which is not shown here. This will be the case if the standards ports on the NetMan Desktop Manager server (9300, 9301, 9302, 80, 443) are already in use. If this is the case, designate alternative ports for your NetMan Desktop Manager system.
The subsequent installation process may include a prompt to enter port numbers, which is not shown here. This will be the case if the standards ports on the NetMan Desktop Manager server (9300, 9301, 9302, 80, 443) are already in use. If this is the case, designate alternative ports for your NetMan Desktop Manager system.
5. Map a share for NetMan Desktop Manager. The share is used for NetMan Desktop Manager's internal communication operations. We recommend using the name suggested for the share:
6. In the Ready to Run Installation dialog, click on Install to begin the installation. NetMan Desktop Manager installs the server component with all associated programs.
7. At the end of installation, tick the box next to Start the NetMan Activation Wizard and click Finish to close the Setup program and register your NetMan Desktop Manager software:
![]() Tick the box next to Apply the data from the earlier NetMan installation to load your user data from the earlier NetMan Desktop Manager installation in your new NetMan databases. All you have to do is specify the path to the earlier installation.
Tick the box next to Apply the data from the earlier NetMan installation to load your user data from the earlier NetMan Desktop Manager installation in your new NetMan databases. All you have to do is specify the path to the earlier installation.
The installation of the NetMan Desktop Manager server components is now complete. The installation of the NetMan Desktop Manager client component, NetMan Client, begins automatically if no NetMan Client is detected on the server. For details on installing the NetMan Client, see "Install NetMan Client". For details on how to license your NetMan Desktop Manager software, see "Register NetMan".