This chapter explains how to publish collections using the NetMan Client. To do this, the collection must be allocated to a NetMan resource; in this example, to a station. (The procedures for allocating users and profiles are the same as for stations.) Allocation of a Collection is defined in the properties of the resource. Resource properties are edited in the NetMan Center. You can open the NetMan Center using the NetMan Tools desktop shortcut.
![]() The client station cannot open the station management section of the NetMan Center unless the NetMan Client is installed on the client and connected to the NetMan Desktop Manager server.
The client station cannot open the station management section of the NetMan Center unless the NetMan Client is installed on the client and connected to the NetMan Desktop Manager server.
1. Open the Station view: In the NetMan Center, click on the Stations selection button in the sidebar to open the Station view.
2. Open the client station properties: In the Station view, double-click on a client station to open its properties.
3. Open the Selection dialog: Click the browse button next to the Windows Start menu field.
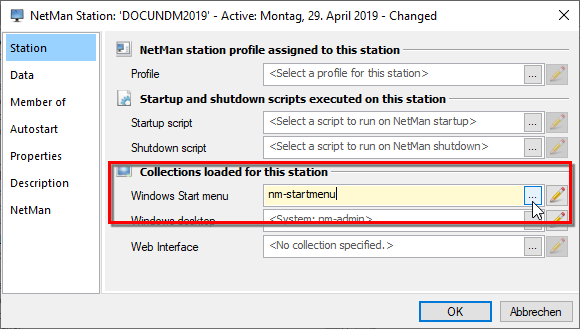
4. Select a collection: In the Collection Selection dialog, select the Collection you wish to allocate to this client station:
![]() This dialog shows only those collections that are suitable for display in the Windows Start menu. These are start menu and universal collections. For details on collections and their types, see "Creating Collections“.
This dialog shows only those collections that are suitable for display in the Windows Start menu. These are start menu and universal collections. For details on collections and their types, see "Creating Collections“.
Click the OK button to enter the collection.
5. Confirm: Click the OK button in the Resource Editor. The collection is assigned to the client station.
Groups and profiles
In the instruction, a collection was allocated to a single station for demonstration purposes. This procedure is not recommend for use in environments with large numbers of clients. Collections are generally allocated to both users and stations. The procedure is much easier when you use the NetMan Desktop Manager profiles to allocate collections. Profiles can be used to group stations or users; for example, by company department (accounting, sales, etc.). This has the advantage that you can edit the properties centrally. For details on using profiles, see "Profiles“
When allocating a collection, the NetMan Start menu shows the user a restricted working environment by providing a specific collection of scripts, namely only this collection and nothing else, except the button Log out. The NetMan start menu replaces the classic Windows start menu and, from Windows 8, the start page. An additional setting prevents the start of Windows apps. To load the NetMan Start Menu for users instead of the Windows Start Menu or the Windows Start Page, modify the NetMan startup script that is loaded for the respective users:
![]() For details on creating a new startup script, see "Create NetMan Startup/Shutdown Scripts“.
For details on creating a new startup script, see "Create NetMan Startup/Shutdown Scripts“.
1. In the NetMan Center, click the selection button scripts, then, in the selection window, NetMan (startup/shutdown) and open the startup script. In the example we edit the default NetMan startup script (ID: NM_STARTSCRIPT).
2. In the ribbon, in the section Action, click on User and add a session configuration action.
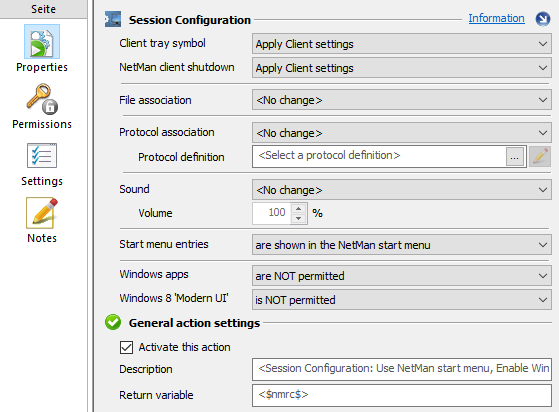
3. On the Properties page, next to Start menu entries select the option are shown in the NetMan start menu:
4. Next to Windows apps select are NOT permittedto prevent the launch of Windows apps bypassing NetMan Desktop Manager:
5. Next to Windows 8 ‘Modern UI’ select is NOT permittedto prevent the Windows start page from being opened:
6. If the settings of the Session Configuration action should not be applied to all users, set appropriate permissions on the Permissions page. Switch to the Permissions page.
![]() For details on creating permissions, see "Create Global Permissions“.
For details on creating permissions, see "Create Global Permissions“.
7. In the ribbon, save the script by clicking Save. From now on, all users to whom the startup script applies will use the NetMan Start menu with the specified start menu collection. They cannot launch Windows apps or open the Windows start page.
Since we were editing the default startup script of NetMan Desktop Manager directly in the example, the settings apply to all users, stations or profiles to which no other start script is assigned. If, for example, you have created a new startup script, you must assign the start script to the respective objects.
Assign the startup script globally
On a global level you assign the startup script in the NetMan settings:
1. Open the NetMan settings via the NetMan Tools.
2. In the NetMan section, click to open the Default page.
3. Next to Startup script click the Select button.
4. In dialog Script selection select the startup script and click OK.
5. In the ribbon, save the changed settings by clicking Save.
Assign the startup script at object level
If you only want the start script to apply to certain NetMan resources, assign it at object level. You apply a startup script to multiple resources by assigning them to profiles:
1. In the NetMan Center, you open the corresponding resource, e.g. a station profile, via selection buttons and selection window.
2. On the station profile (or station, User, user profile) page, next to Startup script, click the Select button.
3. In the Script selection dialog, select the startup script and click OK.
4. Confirm and save the changed settings with OK.
For details on using NetMan Desktop Manager resources, see "Resources“.