Access time definitions specify one or more time intervals during which an Action or a Script is accessible. Thus a time definition is a time-specific access permission. In Advanced Scripts, you can define permissions for each individual Action in a Script separately. This applies to NetMan Startup and Shutdown Scripts as well. Streamlined Scripts, on the other hand, have one permission defined globally. This chapter explains how to create new time definitions and edit existing ones, and lists the properties of access time definitions.
Creating access time definitions
Access time definitions are created in the NetMan Center.
1. Select Resources: Click on the Resources button in the sidebar.
2. Open the Time Definitions view: Click on Time definitions in the sidebar to activate the Time Definitions view.
3. New: Click on the New button in the Ribbon.
4. Enter time definition ID: Enter an ID for the new time definition in the Time definition field.
![]() If you activate the Open the new object in the editor option, the new time definition is automatically opened in the Resource Editor.
If you activate the Open the new object in the editor option, the new time definition is automatically opened in the Resource Editor.
Editing access time definitions
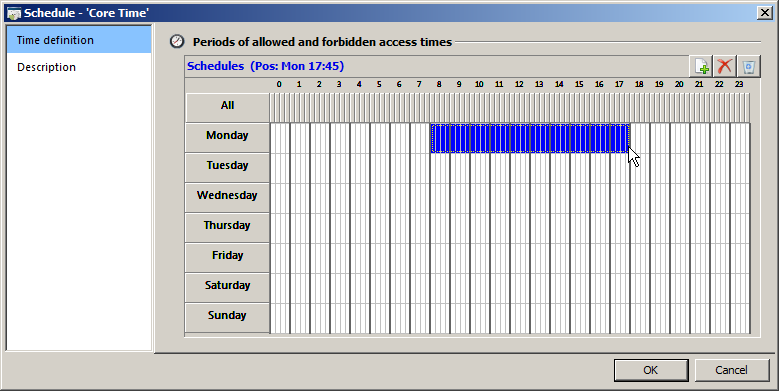
Access time definitions are edited in a special version of the Resource Editor. This editor has only two dialog pages for configuring time definitions: Time definition and Description. All of the settings for the time period(s) are entered on the Time interval page. You can edit intervals using the buttons above the interval table:
New. Generates a new interval from the selected period.
Delete. Deletes the selected interval.
Delete all. Deletes all defined intervals.
Creating an interval
1. Select interval: Use the mouse to select the interval by clicking on the desired starting point and then dragging the mouse, still holding down the mouse button, to the desired end point.
2. New. Click on the New button above the interval table. An interval is created in accordance with your selection. Within the interval table, you can create any number of intervals for your time definition.
Deleting an interval
1. Select interval: Use the mouse to select the interval by clicking on the desired starting point and then dragging the mouse, still holding down the mouse button, to the desired end point.
2. Delete: Click on the Delete button above the interval table. All intervals within the selected period will be deleted.
![]() Click on Delete all to delete all defined intervals regardless of any selection.
Click on Delete all to delete all defined intervals regardless of any selection.
On this page, you can enter a description of your time definition; for example, to describe its intended use.
Once you have entered all of the required details, and any optional data as desired, click the OK button to save your changes.