Advanced scripts have no predefined function and thus can be configured for practically any task with the exception of NetMan startup and NetMan shutdown, for which NetMan startup and shutdown scripts are required. Advanced scripts can contain your choice of actions and settings. They can launch programs, map drives, set permissions and write registry entries. To create advanced scripts, however, you have to understand what the various actions do, and configure the entire script sequence from beginning to end yourself. If you don't require the script to do anything more than launch a program, and perhaps mount a drive or insert a CD image, then a program script is all you need. Advanced scripts let you create sequences that go beyond the capabilities of the streamlined program or URL scripts.
Scripts are created in the NetMan Center. To open the NetMan Center, use the NetMan Tools shortcut on your Windows desktop. The following describes how to create an Advanced script and add actions to it. Practical examples illustrating the features of the most commonly used actions are provided as well.
1. Open the Script view: Click on Scripts in the sidebar to open the Scripts view.
2. Select script type: Click on Advanced in the sidebar:
3. New: Click on the New button in the ribbon:
4. Enter a name: In the Create a new NetMan script dialog, enter a name for the script in the Name field and, if desired, a description in the Description field:
![]() Tick the box next to Open the new object in the editor to have the script automatically opened in the Script Editor. Alternatively, you can open the script yourself once it has been created.
Tick the box next to Open the new object in the editor to have the script automatically opened in the Script Editor. Alternatively, you can open the script yourself once it has been created.
5. Create the script: Click on the Create button. If you ticked the box next to Open the new object in the editor, the Script Editor now opens automatically with this script loaded for editing. Otherwise, double-click on the script to open it in the Script Editor.
Actions are the individual process steps in a script. Generally speaking, a script processes each action in sequence in the order in which they are shown, from top to bottom. However, your NetMan Desktop Manager program also lets you configure Scripts to skip certain actions, or to go back and repeat actions, by inserting GoTo or Loop Actions. Actions also have a number of editable properties that can modify how (or whether) they execute, including:
•General properties
•Return values
•Permissions
General properties:
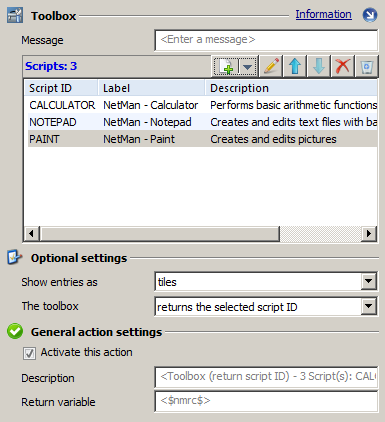
These properties generally determine what the action does. Not all actions have the same general properties. For the Toolbox action, for example, you can configure which Scripts are presented to the user, a descriptive text, how the Toolbox entries are displayed, and whether or not the Toolbox remains open after a script is chosen and launched.
Almost all actions have return values. In other words, when the action executes, a certain value is stored and made available to subsequent actions for processing. Some actions, such as the Cancel action, do not have return values, as it would not make much sense. Return values are stored in return value variables. The NetMan Desktop Manager program has a default variable it uses for return values. You also have the option of defining your own variables. There is one significant difference between the two methods:
•When you use the NetMan Desktop Manager default return value variable, the value stored in it is overwritten by the next value returned. As a rule, the very next action will define and store a return value, which means the first return value is passed only to the next action and afterward is no longer available.
•When you define your own return value variable, on the other hand, the stored return value is not overwritten, unless you configure otherwise. Thus the values in your own variables are available for use in all subsequent actions within the script. The use of these variables is, however, limited to processing within the script in which they were created; they are not accessible to the action sequences in other Scripts.
![]() You also have the option of storing an action's return value in the NetMan Desktop Manager environment, using an Environment action. This makes the value available for use in other Scripts.
You also have the option of storing an action's return value in the NetMan Desktop Manager environment, using an Environment action. This makes the value available for use in other Scripts.
The use of variables you define yourself gives you more flexibility, because you can determine the point within the script at which the return value is processed.
Permissions
You can assign 'execute' permissions to each action. Permissions can be granted not only based on your Windows or network structures, but on the entire NetMan Desktop Manager structure of rights. Thus you can make the execution of any action dependent on conditions, or on membership in a group or profile. For details on the privileges and conditions available for configuring action execution, see "Create Global Permissions".
Each action has a Permissions page containing a list for management of the action's permissions:
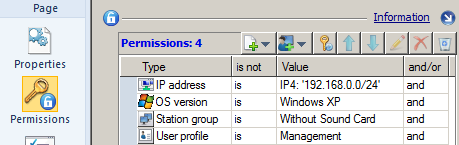
The list is processed in the order in which it is shown, from top to bottom. In the example shown above, the action will execute only if the IPv4 address of the user's station is within the range from 192.168.0.0 to 192.168.0.255, the user's operating system is Windows XP, their station belongs to the "Without Sound Card" station group and the user is assigned the "Management" profile. If any of these conditions is not met, the action is denied permission to execute. The entries are processed logically by NetMan Desktop Manager: each entry is a proposition that is either true or false. The granting of 'execute' rights for this action will depend on the truth value resulting from the evaluation of all entries in the list. For example, the expression
User = "JOE BLOGGS" and User = "ADMINISTRATOR"
is always false (due to the AND operator), while the expression
User = "JOE BLOGGS" or User = "ADMINISTRATOR"
is true whenever the user name is either "Joe Bloggs" or "Administrator" (logical OR rather than AND).
![]() In evaluating these logical expressions, the AND operator has a higher priority than the OR operator.
In evaluating these logical expressions, the AND operator has a higher priority than the OR operator.
Thus if both AND and OR operators are found, the values are weighted. For example, the following arguments:
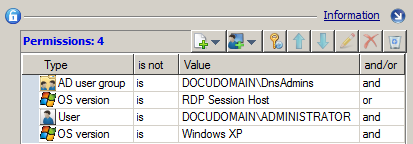
are implicitly interpreted as follows:
("AD user groups" = DOCUDOMAIN\DnsAdmins" AND "Operating system version" = "RDP Session Host") OR ("User" = "DOCUDOMAIN\Administrator"\administrator" AND "Operating system version" = "Windows XP")
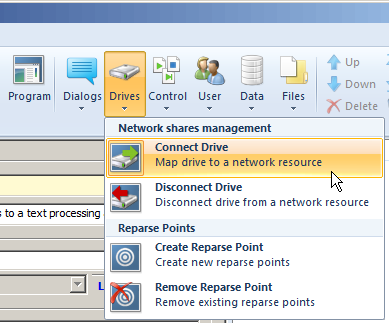
1. Add action: To add an action, click on the desired category in the Ribbon and select the desired action from the category menu:
![]() For details on which actions are in each category, see "Actions".
For details on which actions are in each category, see "Actions".
2. Define properties: Click on the Properties icon in the sidebar and define the properties of the action:
Which options are available here depends on which action you are configuring. See "Actions" for descriptions of all action properties. The action-specific settings come first. Many actions also have additional options listed under Optional settings. The General action settings section shows the options that are available for all actions:
Activate this action. Deactivate this option to deactivate this action within the script you are currently editing.
Description. You can enter a description of the action, for example to show the intended purpose of the action at a glance. If you leave this field blank, NetMan Desktop Manager will add a description. The description is used to designate the action in the NetMan Debugger program.
Return value variable. You can specify a user-defined return value here. If you leave this field blank, NetMan Desktop Manager will use the default return value variable. For details on using return value variables, see "Return Values" in this chapter. Not all actions have return values. For some actions, a return value would not make sense. for example, the Cancel action does not return a value.
The examples below illustrate the configuration and use of actions. Some of the examples also demonstrate the combination of multiple actions into practical and commonly used sequences, as well as the use of other NetMan Desktop Manager tools. The following examples are given:
•Change Collection: The purpose of the Change Collection action is to load a specified NetMan Collection in place of the one currently in use. The action is indispensable for administrators.
•Simple input prompt: This example shows the use of a File Dialog action, a return value variable, and the controls in the NetMan Debugger.
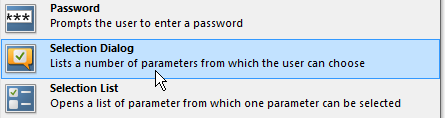
•Complex input prompts: Demonstrates the use of the more complex input prompts generated by the Selection Dialog, Selection List, File List and Toolbox actions. This example also demonstrates the concept of permissions as used within NetMan actions.
•Group-dependent program launch: Which program is opened depends on the user's group membership.
•Control of script sequences: Shows how Control actions can be used to influence the script sequence. This example uses the Go To/Marker, Loop, Conditional Label and Cancel actions to create complex script sequences, with defined reactions for adaptation to user inputs and scripting errors. Furthermore, the Connect Drive and Connect Network Printer actions are demonstrated as well.
•Parameters: Illustrates the use of the Parameter action to store user input as a string and use it in a subsequent action. This example also explains how to have a script analyze Windows system variables, as well as how to pass the return value from the Parameter action to a Set Registry Entry action to have it written in the Windows registry.
•Copy files/folders: Shows how to create scripts that can create, copy and delete files and folders. The example uses the Parameter, Create Folder and Copy Folder actions to create a data backup.
•Integrating CD-ROM-based applications: Provides a full description of how to integrate a CD-ROM-based application in NetMan Desktop Manager. The example details the configuration of NetMan Desktop Manager for the use of virtual drives (with the Virtual CD program) and images as well as how to create scripts for inserting and ejecting virtual CDs, using the Insert Virtual CDs and Eject Virtual CDs actions.
The Change Collection action loads a different Collection in the NetMan Client. You can define whether NetMan Desktop Manager loads a particular Collection or opens a list of all Collections for the user to choose from. Furthermore, you can specify whether the new Collection is loaded in the Start menu, on the desktop or in the position from which the script was started:
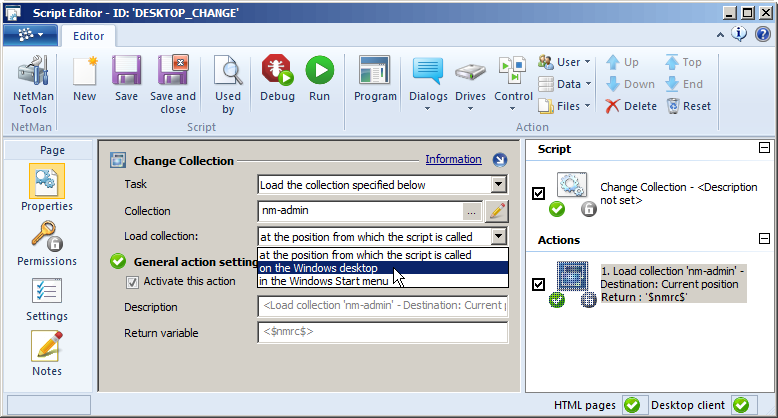
![]() Create a reference to a script with a 'Change Collection' action in all of the new Collections you create, to avoid getting "stuck" in a Collection during testing with no way to return to your original Collection. Assign permissions for this script if you wish to prevent your users from changing their Collection.
Create a reference to a script with a 'Change Collection' action in all of the new Collections you create, to avoid getting "stuck" in a Collection during testing with no way to return to your original Collection. Assign permissions for this script if you wish to prevent your users from changing their Collection.
![]() Deactivate the Execute configuration in a session option. The 'Change Collection' action makes sense only in the context of the NetMan Client.
Deactivate the Execute configuration in a session option. The 'Change Collection' action makes sense only in the context of the NetMan Client.
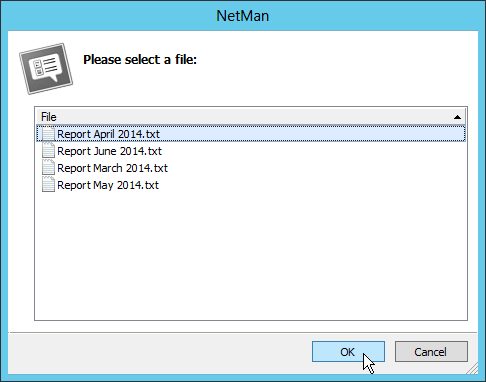
In NetMan Desktop Manager you can configure actions to prompt simple user input; for example, in a standard File Open dialog. In the following example, a dialog opens with a choice of files; when a file is selected, it is opened in a program for editing. The action is called the File Dialog action. In this example, the File Open dialog presents a list of TXT files for selection and then runs the Windows Editor:
1. Create a new script.
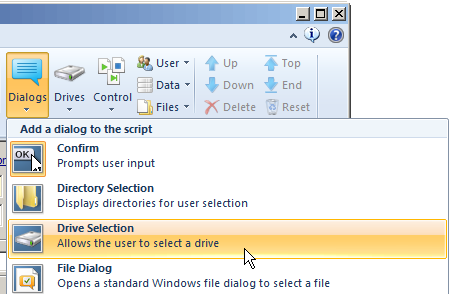
2.Add a File Dialog action:
3. Edit the properties of the File Dialog action:
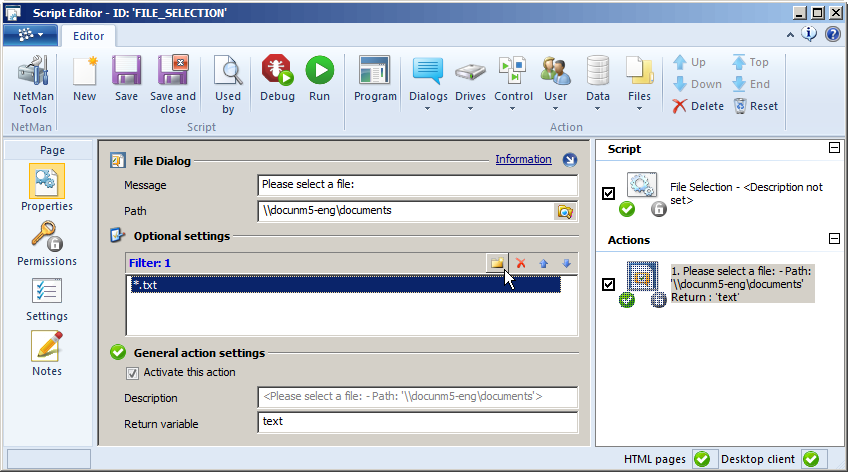
In the Message field, enter a message that informs the user about the selection to be made. In the Path field, select the path to be initially opened in the input dialog. The user will be able to navigate to a different path. In the Filter list, specify the file name extension(s) of the files to be displayed in the dialog. The user will be able to select any file that matches this specification. To add a file name extension, click on the New button at the top of the list and enter a placeholder followed by the desired file name extension. In the Return variable field, specify a return value variable. In our example, we've called the variable text.
4. Configure a Program action.
5. In the Program section of the action properties, specify the program to be launched; in this example, the Windows Editor. In the Parameter field, enter the name of the return value variable to be read; in this example, %text%:
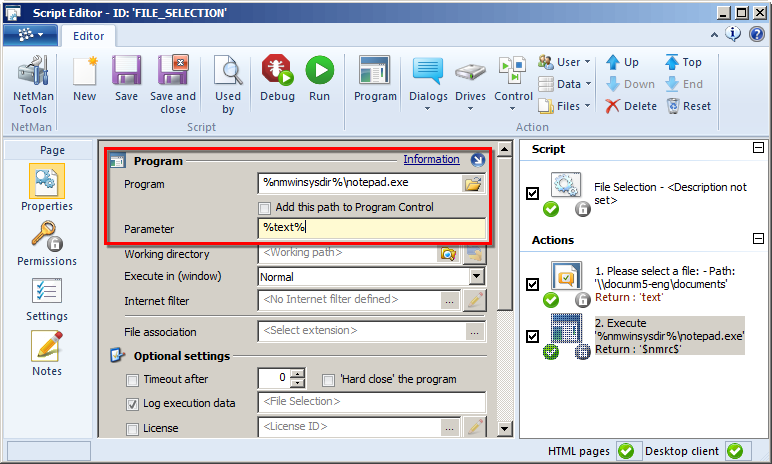
If the environment has variables for the path name given, NetMan Desktop Manager will convert the input to a variable automatically. That's all that needs to be configured for this example.
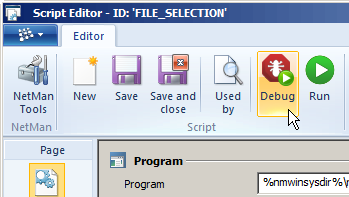
When a script is executed, the processing of a sequence of actions is initiated. Before making the script available for general use, it should be tested for proper execution. To do this, we run the script using the NetMan Debugger program, a utility that visualizes the processing sequences that actually run in the background. Open the Debugger directly from the Script Editor to check script processing:
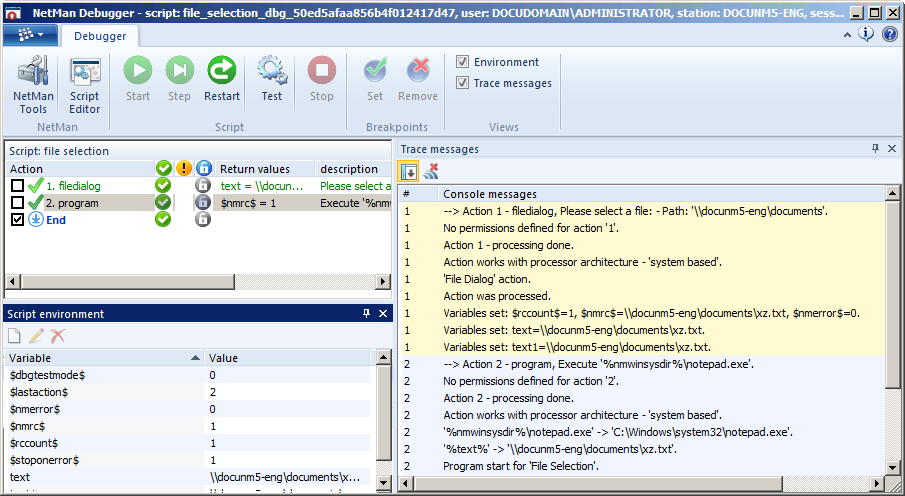
The NetMan Debugger displays the action sequence and the messages that are output to the console. Click on the Start button. The Debugger executes the script and sends messages to the Trace Monitor during execution. This lets you see the point at which a problem occurs:
For details on using the NetMan Debugger, see "NetMan Debugger".
The "Simple input prompt" example above shows how to program a standard dialog to open and prompt the user the select a file. The dialog, however, allowed access to more than one directory. With NetMan Desktop Manager, you can implement more advanced functions following the same basic principles. The following example involves using the Selection Dialog, Selection List, File List and Toolbox actions.
The Selection Dialog action opens a dialog box containing user controls in the form of buttons. You can define the button functions as desired. Each response stores a particular value in this action's return variable. This value can in turn form the basis for other conditions defined in subsequent actions:
1. In the Action section of the ribbon, click on Dialogs and choose Selection Dialog:
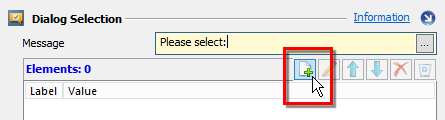
2. In the Message field, enter a message to the user; e.g., an instruction or description.
3. The buttons defined are listed with their return values in the list box below that field. Click on New to add a button and define its value:
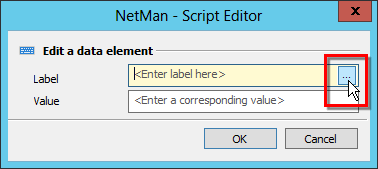
4. In the Edit element dialog, enter a name (label) for the button and define the value to be returned when the button is clicked: If you wish to create button labels in multiple languages, click on the 'browse' button to the right of the input field to open a dialog for defining the label in the other language(s).
![]() Defining labels in one or more additional languages is purely optional. If you only use one language, simply enter the desired text and the move on the Value field.
Defining labels in one or more additional languages is purely optional. If you only use one language, simply enter the desired text and the move on the Value field.
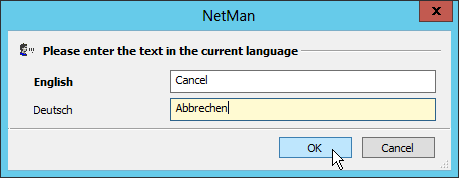
5. Enter the label in the desired additional language(s) and click on OK:
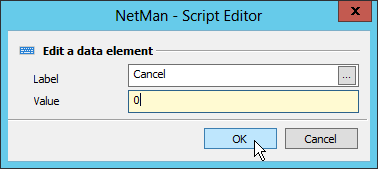
6. In the Edit element dialog, enter the desired value and click on OK:
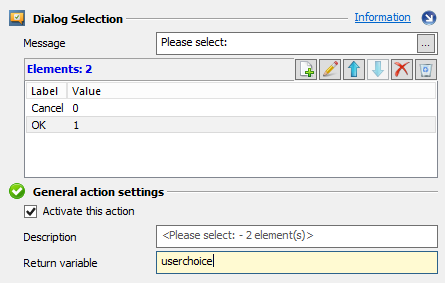
7. The first button-value pair is now shown in the list. Repeat these steps to define further buttons as desired, with a label and a return value for each. The value is returned in a variable which can be used to influence subsequent processing:
To present the user which a large number of elements to choose from, we recommend using the Selection List action, which can list any number of options:
Selection and File Dialogs are generally useful for generating values to be passed to programs in the form of command line arguments. The File Dialog was introduced in the previous example, "Simple input prompt" above. It opens the standard Windows file selection dialog. If you use a File List action instead, the user cannot browse in other drives, networks or directories. The user can select only from among the elements in the list, defined by you,the NetMan administrator. Wildcards are permitted in specifying the items to be listed. You can define whether this selection window shows the file size, date, and/or attributes, and specify the maximum number of files that can be selected:
The File List action comes with several predefined return values. The total number of files selected is stored in the $rccount$ variable. Furthermore, each selected file can by called using a return value variable to which a sequential number is appended, e.g. $nmrc$1 or ReturnValue1.
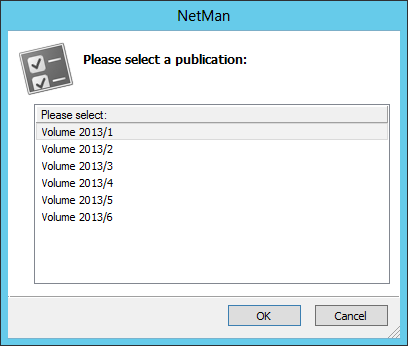
You can combine the various actions as desired to create complex script sequences for complex queries. The following example shows the use of the Selection Dialog and Toolbox actions to present the user a list of office software suites to choose from. Prerequisite is prior installation of the suites in question and their prior integration in NetMan Desktop Manager using Program Scripts. For details on creating Program Scripts, see "Create Program Scripts". The following example shows how to create a script a) offers the user a choice between office software suites (MS and OpenOffice) and then b) based on the selection, opens a NetMan Toolbox interface listing the applications to choose from in that suite.
1. Create a new advanced script.
2. Add a new Selection Dialog action as described in detail above. Our example is set up to offer a choice between Microsoft and OpenOffice:
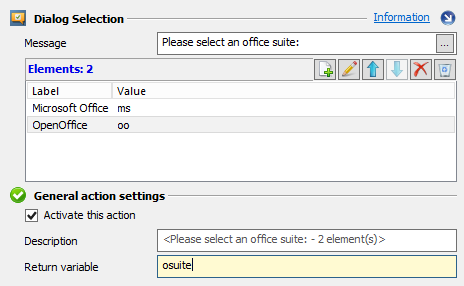
If the MS suite is chosen, the return value "ms" is stored in the "osuite" variable; for OpenOffice, the return value is "oo".
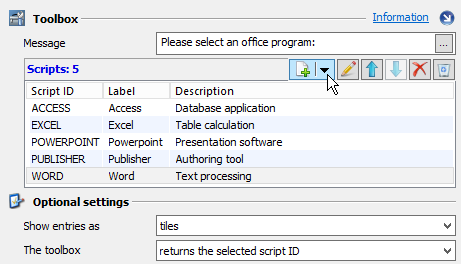
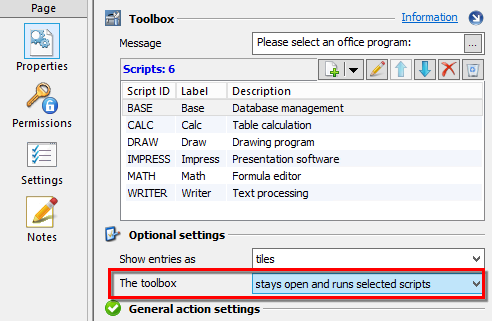
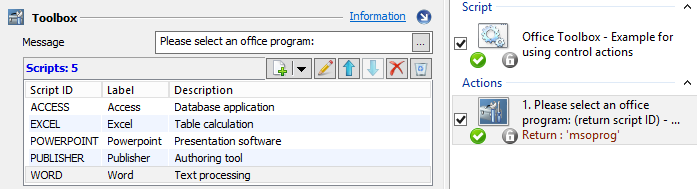
3. Create a Toolbox action: in the Action section of the ribbon menu, click on the Dialogs button and select Toolbox.
4. On the Properties page, under Scripts, configure the list of Scripts to be made available in this toolbox. To do this, click on the New button at the top of the list and choose Selection; this opens a dialog for script Selection. The configured Scripts are shown in the list:
5. On the Permissions page, define the condition under which the toolbox will be opened for the user. In our example, the "osuite" variable has to contain the value "ms," because the toolbox shows the Program Scripts created for serving the Microsoft programs. Click on the New condition button and the top of the list and select Variable.
![]() For an overview of the conditions available, see "Create Global Permissions".
For an overview of the conditions available, see "Create Global Permissions".
6. In the dialog, enter the required variable on the left and the value it must contain on the right, and click on OK:
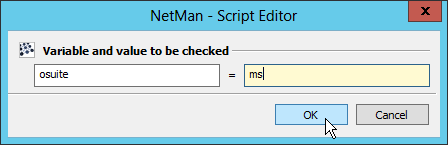
The condition is added to the list:
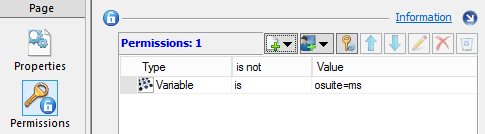
As a result of these configuration steps, the Toolbox containing the Microsoft Office applications is shown only if the user selects "Microsoft" as the office suite option, which causes "ms" to be stored in the relevant variable.
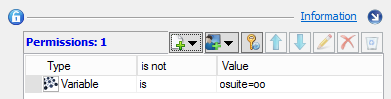
7. We insert another Toolbox action and add the OpenOffice programs to it:

8. We assign a permission to the second Toolbox action as well. This permission has the effect that the action is executed only if the user chooses the "OpenOffice" option in the Selection Dialog, thus storing the Value "oo" in the "osuite" variable:
9. The Toolbox action can operate in either of two modes: In the first of these, it remains open and the Scripts started are directly from the Toolbox; in the second the toolbox is automatically closed and the script ID for the selected program is passed to the subsequent actions. In our example, we choose to have Scripts started directly from the Toolbox. To do this, we configure both Toolbox actions by setting the The toolbox option to stays open and runs selected Scripts:
10. Now we save the script and test it. Following a successful test, the script is ready to be added to a collection of your choice.
![]() With the default settings, the script is displayed with only a standard icon on the desktop or in the Start menu. You can assign a more meaningful icon if desired. To do this, open the script properties and click on the Change icon... button:
With the default settings, the script is displayed with only a standard icon on the desktop or in the Start menu. You can assign a more meaningful icon if desired. To do this, open the script properties and click on the Change icon... button:

Group-dependent program launch
In the previous example, you saw how to define conditions for the execution of actions. In NetMan Desktop Manager you also have the option of linking action or program execution to other conditions, such as membership in a specified user group or OU in Active Directory. For example, a single script can thus be made to start one particular application for one user group, and a different program for another user group. In the following example, the Microsoft Word application starts for Members of the "Staff" group, while for guests, only the Word Viewer opens:
1. First we define a Program action in our script that runs the Word application.
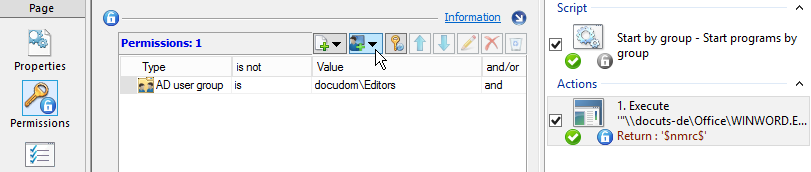
2. We assign a permission to the action for the AD user group "Editors," so that only editors can run MS Word. To do this, open the Permissions page, click on the New button at the top of the list, and select the desired object; in our example, AD user group:
![]() For an overview of possible permissions, see "Create Global Permissions".
For an overview of possible permissions, see "Create Global Permissions".
3. Next, we create a Program action that launches the Word Viewer and grant access for the AD user group "Staff":
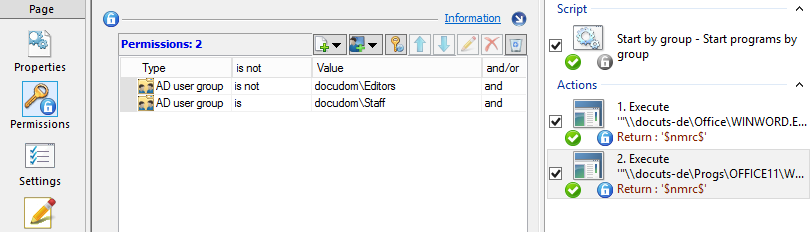
The order in which the elements are processed is decisive in this script. The first step checks whether the user belongs to the AD user group called "Editors". If so, Microsoft Word is launched. The second action checks which AD user group the user belongs to. First it is ensured that the "Word Viewer" program is not launched for members of the "Editors" group, is this would result in both programs being launched for editors by this script. Second, the action checks whether the user belongs to the AD user group called "Staff". If so, the "Word Viewer" program is launched.
4. The user may belong to some other AD user group, and belong to neither the "Editors" or the "Staff" group; for example, when a guest account is used. By assigning a permission to the script itself, we ensure that such a user is not shown this script in any collection in the first place.

The particular configuration of this permission depends on your network configuration. In our example, the script can be called from any workstation that is assigned to a staff member; these are all members of the "Staff Workstations" AD group.
In addition to adjustment of the processing sequence and configuration of permissions, the Control actions in NetMan Desktop Manager give you another mechanism for control of script processing. These include the Cancel, Wait, Loop/End loop, Go To and Marker actions. Control actions are added by clicking on the Control button in the Action section of the ribbon. You can use these actions to modify the order in which actions are processed within a script. This is useful, for example, when you want to have particular actions executed in dependence on the values in return variables, or have the script skip to a different step in the sequence when a condition is not met. The following example demonstrates the use of the Go To/Marker and Cancel actions. Here, we have a Toolbox which offers a selection of MS Office programs, all of which are freely accessible except Microsoft Access, which is password-protected. A Password action prompts the user to enter the password. Following correct password input, the Access application is launched. If the user does not enter the correct password, he or she has the choice of returning to the Toolbox or canceling the program launch. This complex, carefully controlled script is created as follows:
1. First we add a Toolbox action containing the desired Office programs. We also define a return value variable for this action: msoprog:
![]() The value passed in this variable by the Toolbox action is the script ID of the selected program; for example, "WORD_2003" for MS Word.
The value passed in this variable by the Toolbox action is the script ID of the selected program; for example, "WORD_2003" for MS Word.
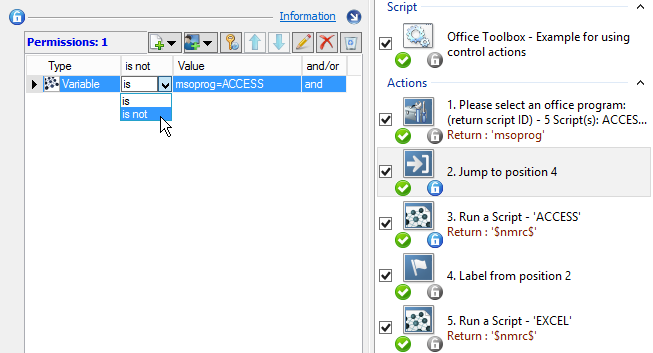
2. To launch the selected program, we add a script action for each; first for MS Access, and then for the other Office programs. Under Permissions, we select the msoprog variable as a condition for launch of the script actions; as the value it contains is a script ID, it determines which program is launched.
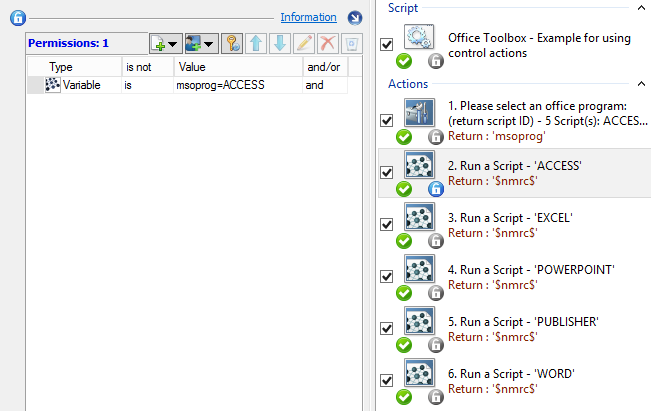
This procedure functions as desired because the scripts are always processed in the order shown, from top to bottom. Only those actions are executed which meet the condition in the relevant return value variables.
3. To accomplish the intricate script sequence control this requires, we simply use Control actions. If MS Access is chosen, the subsequent action executes, prompting the user to enter the password. If a different program is chosen, the Go To Marker action causes the script processing to skip to the other program actions. A permission is assigned to the Go To Marker action, so that executes only on the condition that the return value stored in the variable called msoprog is not "ACCESS" (the script ID for the script that launches MS Access):
4. After the Go To Marker action, we insert a Password action and configure it to prompt for input and store it in a return value variable:
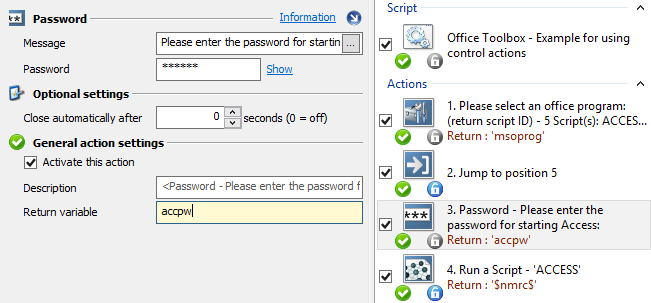
![]() To formulate the prompt so that the correct value is returned by the Password action, it is important to know the exact parameters of the Password action itself. The Password action returns fixed, input-dependent values: 0 for an error, or 1 for correct password input. If you are uncertain about the correct use of any particular action or about its exact parameters, click on the Information link in the upper right-hand corner of the action. This opens the "Actions" chapter of the online help at the relevant section.
To formulate the prompt so that the correct value is returned by the Password action, it is important to know the exact parameters of the Password action itself. The Password action returns fixed, input-dependent values: 0 for an error, or 1 for correct password input. If you are uncertain about the correct use of any particular action or about its exact parameters, click on the Information link in the upper right-hand corner of the action. This opens the "Actions" chapter of the online help at the relevant section.
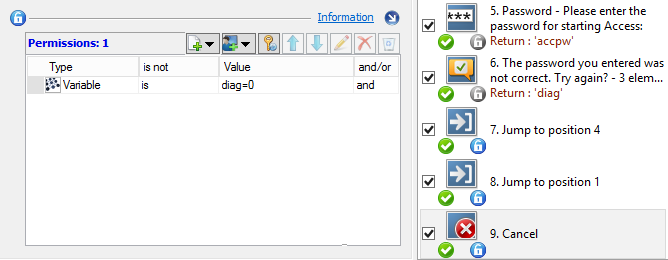
5. What happens next depends on the actual input at the password prompt; e.g., on whether the password was entered correctly, and on what you wish to happen if it was not. In our example, incorrect password input causes a dialog to open (by means of a Selection Dialog action); the choice made here determines what happens next. The options are a) try again to enter the correct password, b) return to the Toolbox, or c) abort the script processing (i.e., the program launch). Furthermore, a variable called diag is created for the return value:
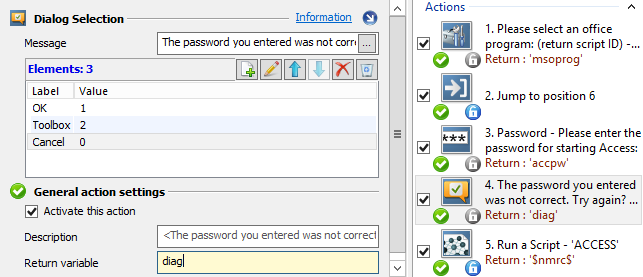
A permission is assigned to the Selection Dialog with the condition "Value in accpw variable = 0" so that the dialog opens only if password input was not successful.
6. The option of re-entering a password is implemented through use of a Go To Marker action, with the concomitant marker directly preceding the Password action. In addition, for the Go To Marker action we define the condition diag= 1:
![]() To move an action, select it and use the Up or Down arrow.
To move an action, select it and use the Up or Down arrow.
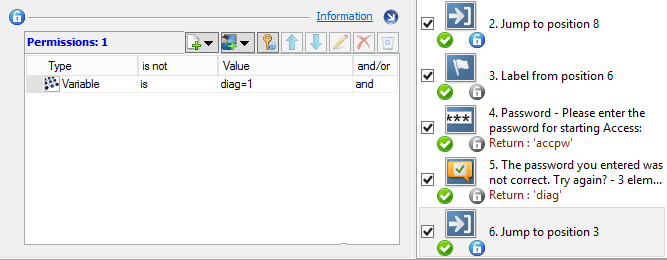
7. The option of returning to the Toolbox dialog is implemented through another Go To Marker action. The corresponding marker in this case is positioned directly prior to the Toolbox action. The condition for execution of the Go To Marker action is diag = 2.
8. The 'Cancel' option is implemented using a Cancel action. The condition is diag = 0:
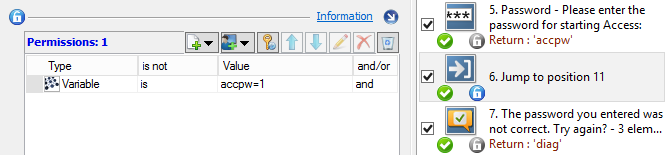
9. If password was entered correctly, the script jumps directly to the MS Access launch. This is implemented by placing a Go to Marker action directly after another Go To Marker, with its marker position directly before the Program action that launches MS Access. The condition for program launch is accpw = 1:
10. Save the script by clicking Save. Following a successful test, the script is ready to be added to a collection of your choice.
The example above is rather complex because the user is offered a number of options. With simpler queries, the Loop and Conditional Label actions can lighten your workload as well. To illustrate this, we shall once again use the example of password input. A simple password prompt would prompt password input repeatedly until the input is correct – a classic example of a loop. In the following example, the loop continues until either the password is entered correctly or the input prompt is terminated by the user:
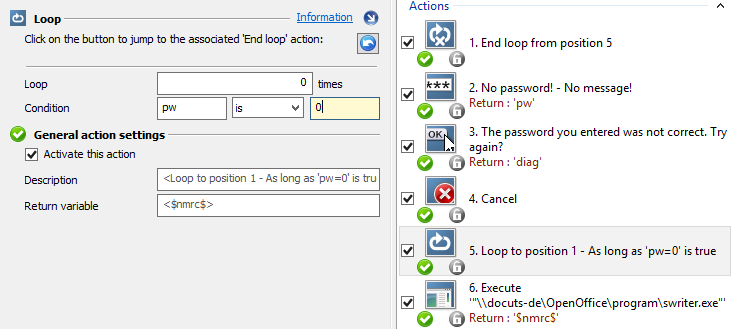
Generally, one of two conditions is defined for a Loop: a fixed number of repeats, or a statement. If you specify a certain number of repetitions, these will be executed regardless of whether a defined statement becomes true in the meantime. Loop <N> times shows the number repeats before the loop is considered to have been completed. In our example, the loop repeats until the password has been entered correctly. Thus no fixed number need be configured, which is why the "0" in that field is left unchanged. Instead, we define the condition that the value stored in the pw variable is 0. The pw variable stores the value returned by the Password action; the value is 1 only when the password is correct. Once the password has been entered correctly, the loop is terminated and the program is launched. To provide the user with the option of terminating this loop, a Confirmation action is added. This opens a confirmation dialog in the event that the password is not entered correctly. The actual cancellation is implemented by a Cancel action, which executes when the required value is found in the diag variable. In practice, the Loop action is often used in the processing of lists.
The Conditional Label action, on the other hand, is frequently used in troubleshooting. As soon as the condition defined for this action is true, the script sequence jumps directly to the Conditional Label. Any other actions between the point at which the condition was met and the Conditional Label are skipped. script processing continues at the Conditional Label. In the following example, we connect a) a network drive containing user data and b) a network printer. Afterward, we launch the Writer program:
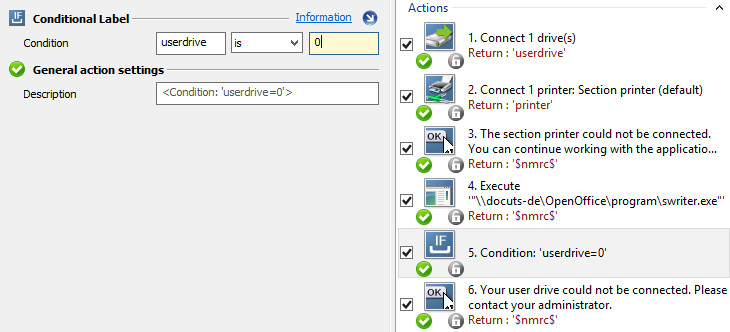
In the example, program launch is conditional on connection of the network drive, because the network drive contains user data required for use of the program. If the connection fails, we do not want the program to launch. The condition for our Conditional Label is that the return value in the userdrive variable is "0". If the connection of the network drive fails at the beginning of the script, the value "0" is written in the userdrive variable and the script jumps immediately to the Conditional Label action. Thus the network printer is not connected, nor is the program started. Instead, an error dialog opens showing an error message.
![]() Keep in mind that if a Conditional Label action executes during normal script processing and the condition defined for the marker is not true, an error will result and script processing stops. A permission defining the required condition must be defined for the Conditional Label (as well as for all actions linked to the condition).
Keep in mind that if a Conditional Label action executes during normal script processing and the condition defined for the marker is not true, an error will result and script processing stops. A permission defining the required condition must be defined for the Conditional Label (as well as for all actions linked to the condition).
In our example, both the Conditional Label action and the subsequent Confirmation action have a permission requiring that the value in the userdrive variable is 0. If the script is processed as we intend it to be (i.e., with no errors), these actions do not execute.
![]() When you connect a network drive or printer or insert virtual media, you should always make sure that these connections are properly disconnected after use. One way to do this is to add the corresponding Disconnect Drive action (or other action, as appropriate) directly in the script, after the Program action, to be executed after the program is closed. In the Program action settings, activate the Hold subsequent action(s) until this program is closed option. (This setting is active by default.) The other method is to use the NetMan Desktop Manager Shutdown script. This is a NetMan startup/shutdown script, entered in the NetMan Settings and executed when the NetMan Client is shut down. It can be configured to disconnect all networks drives, printers, etc. and eject virtual media when NetMan Client is closed. For details on using NetMan Startup/Shutdown Scripts, see "Create NetMan Startup/Shutdown Scripts".
When you connect a network drive or printer or insert virtual media, you should always make sure that these connections are properly disconnected after use. One way to do this is to add the corresponding Disconnect Drive action (or other action, as appropriate) directly in the script, after the Program action, to be executed after the program is closed. In the Program action settings, activate the Hold subsequent action(s) until this program is closed option. (This setting is active by default.) The other method is to use the NetMan Desktop Manager Shutdown script. This is a NetMan startup/shutdown script, entered in the NetMan Settings and executed when the NetMan Client is shut down. It can be configured to disconnect all networks drives, printers, etc. and eject virtual media when NetMan Client is closed. For details on using NetMan Startup/Shutdown Scripts, see "Create NetMan Startup/Shutdown Scripts".
The Parameter action opens a dialog for user input which is then passed to the program as command line arguments.
•If you use square brackets in the Parameter definition field, the user will see only what is inside the square brackets and nothing else in that field. The square brackets might contain spaces, for example, or a default parameter that the user can overwrite. Text outside the square brackets is passed to the program on the command line without modification.
•You can define whether user input is hidden, in which case asterisks are displayed in place of the characters entered.
An example for use of the Parameter action might be a case in which you wish to use the "NET USE" command to connect a network drive and make it available as user drive for the subsequent Program action. Rather than entering the login credentials in a Connect Drive action, a Parameter is configured to prompt user input of a password. A Password action is not particularly well-suited for use here, as it serves to determine whether or not the user has the rights required for the subsequent actions (e.g. to open a certain folder in the NetMan Client) and returns only a value of 1 or 0. The Parameter can return a string:
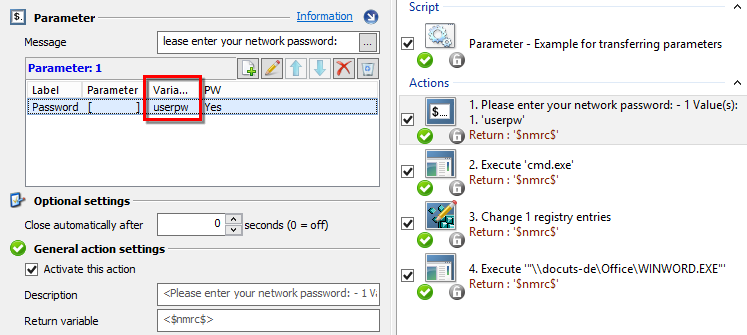
In this example, the password entered is stored in the userpw return value variable and passed to the subsequent Program action as follows:
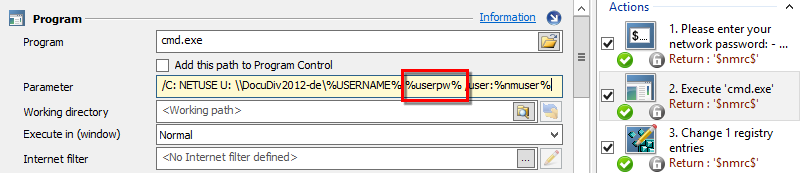
The Program action starts the Windows command line program, Cmd.exe, and passes the NET USE command as an argument. The syntax of the NET USE command is:
NET USE [device name | *] [\\computer name\share name[\data medium] [password | *]][/USER:[domain name\]user name].
The string returned in the userpw variable is used by the NET USE command to log in on the network resource. In this example, a user directory with the current user's name is connected. The NetMan Desktop Manager program retrieves the user name from the USERNAME system variable. For an overview of the currently valid environment variables, check the NetMan Environment Monitor. For details on using the Environment Monitor work, see "Environment Monitor".
![]() NetMan Desktop Manager integrates variables using the syntax %<variable>%. Be sure to observe this syntax consistently, except in cases that explicitly call for a different form.
NetMan Desktop Manager integrates variables using the syntax %<variable>%. Be sure to observe this syntax consistently, except in cases that explicitly call for a different form.
In accordance with the NET USE syntax, the user name of the user currently logged on to NetMan Desktop Manager is passed. The nmuser environment variable is used for this purpose.
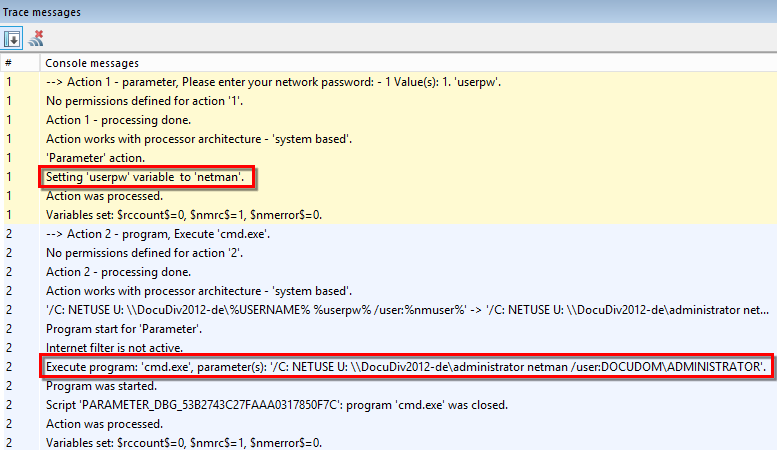
In the NetMan Debugger, you can see how the parameter is written in the return value variable and what is passed in plain text as a command line argument to the Program action:
In our sample script, furthermore, we also set an entry in the Windows registry making our connected user drive the default drive. This is done using a Set Registry Entry action:

NetMan Desktop Manager offers several actions that can modify folders and files. Specifically, these are the Copy Files, Delete Files, Create Folder, Copy Folder and Delete Folder actions. Practical uses include, for example, creating data backups. In the following example, we create a folder with the current date in an archive directory and copy the entire folder of a current project into the new archive folder:
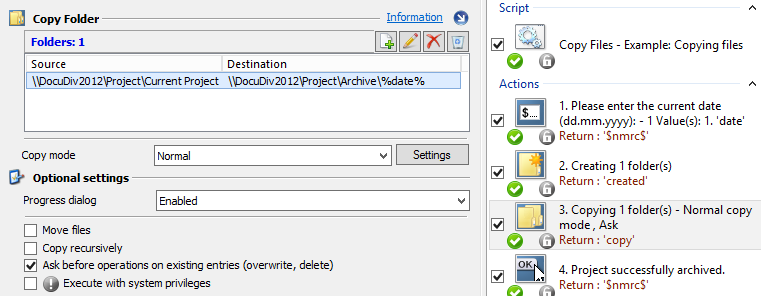
First, a Parameter action is used to prompt the user for the current date; this is then stored in a return value variable called date. The second step is a Create Folder action which creates an archive folder with the current date (retrieved from the date return value variable) as name. Then we copy the current project to the new folder using a Copy Folder action. We have activated the Ask before overwriting folder option so that existing backups will not be inadvertently overwritten. For the Create Folder and Copy Folder actions, return value variables have been defined create and copy). The last action, Confirmation, opens a dialog if the return values in the create and copy variables are 1. The Confirmation dialog informs the user that the data backup was successful.
![]() The Execute with system privileges option makes it possible to modify directories and files even if the active user does not have the required privileges.
The Execute with system privileges option makes it possible to modify directories and files even if the active user does not have the required privileges.
Integrating CD-ROM-based applications
You can provide access to virtual CD-ROM resources using NetMan Desktop Manager, such as magazine CDs or databases on DVD-ROM. Prerequisite is the prior virtualization of the resources with a suitable utility, such as the "Virtual CD" program. We use the term 'CD-ROM-based application' or simply 'CD application' to refer to applications that require access to particular data CDs at runtime. Installing CD applications in a network can be a complex operation, not least of due to the following factors:
•CD applications often run only from the same drive in which they were installed.
•During application setup, the drive designation is often stored in the Windows registry, in INI files or non-editable files, which may mean it can be changed only by re-installing the application.
•The more CDs belong to a given application, the more difficulties are created by the problems mentioned above.
•In a network that has a lot of CD applications, there may be competition among them for a limited number of drive letters.
•CD applications often look for their CD data in a physical CD drive.
![]() If you use Virtual CD TS, be sure to see the chapter entitled "Installation" for details on configuring the Virtual CD NetAccess Helper. Without the additional configuration steps described there, you will not be able to insert images in network shares.
If you use Virtual CD TS, be sure to see the chapter entitled "Installation" for details on configuring the Virtual CD NetAccess Helper. Without the additional configuration steps described there, you will not be able to insert images in network shares.
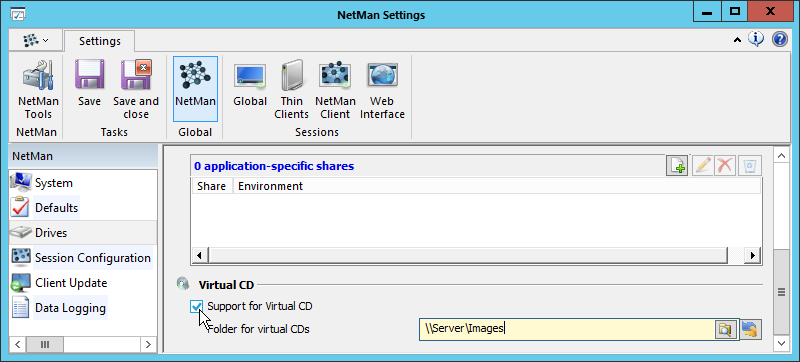
NetMan Desktop Manager uses the Insert Virtual CDs and Eject Virtual CDs action for media control. These actions, however, are not available by default. To access these actions, your NetMan Desktop Manager software must be configured for the use of images. To do this, open the NetMan Settings, go to the NetMan section, open the Drives page, and activate the Support for Virtual CD option. You also need to define the path to your virtual media:
The following example demonstrate the installation of a CD application:
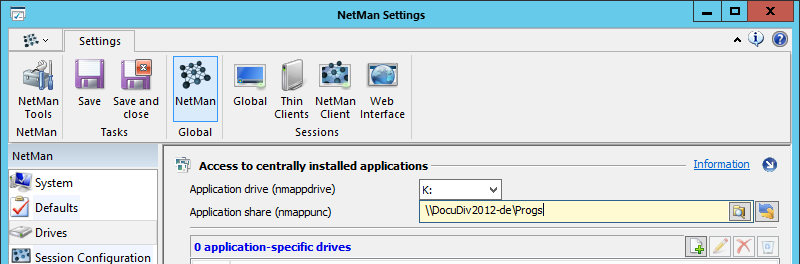
1. The application will be installed K:, a centralized application drive. Our application drive was already defined in the NetMan Settings and, when NetMan Desktop Manager is started, it maps the applications installed on the network to K: on the workstations (NMAppDrive):
2. We insert the image in a virtual drive and install our program, the "Financial Times" application. This is a 32-bit application that uses a built-in reader utility to provide access to articles from the Financial Times magazine. The article archive remains on the CD-ROM, and individual articles are opened as needed. The software is installed on the K: drive.
3. Following installation, we create an advanced script that uses a Program action to launch the application:
![]() Make sure when you enter the full name of the executable file that the path is the same as the path from which the program will later be called. In our example, the path is K:\chnews; the K: drive is defined in the NetMan Settings as the application drive and linked with nmappunc.
Make sure when you enter the full name of the executable file that the path is the same as the path from which the program will later be called. In our example, the path is K:\chnews; the K: drive is defined in the NetMan Settings as the application drive and linked with nmappunc.
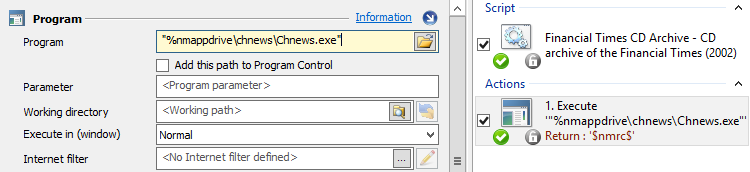
We entered the required data in the Program action by simply opening the K:\chnews folder and use drag&drop to enter the Chnews.exe program in the program input field. NetMan Desktop Manager automatically replaces the explicit path with the nmappdrive variable.
![]() To make sure you assign the correct working directory and include all the required arguments for calling the program, it is a good idea to look at the properties of the Start menu link.
To make sure you assign the correct working directory and include all the required arguments for calling the program, it is a good idea to look at the properties of the Start menu link.
4. Because the application requires access to the data on the CD-ROM, we place an Insert an Image action ahead of the Program action:
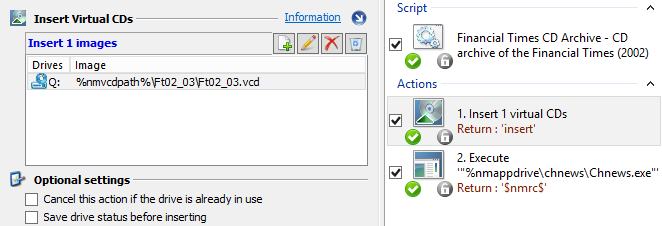
In our example, we use the nmvcdpath rather than entering an explicit path; our \\DocuNM5-ger\Images share is stored in this variable. We have specified this path in the NetMan Settings as our global path for virtual CDs, as mentioned above. You can enter an explicit share name, if you prefer. Furthermore, we specify a variable for the return value, insert, so we can query whether image insertion was successful.
5. To prevent the application from launching if the image is not inserted, we add a permission to the Program action requiring the condition "insert=1". In the event of error, a Conditional Label action and subsequent Confirmation action indicate that program launch was unsuccessful:

For details on using the Conditional Label action, see "Control of script sequences".
6. When the use of the Financial Times application is terminated, the image is ejected. This is implemented by an Eject an Image action:
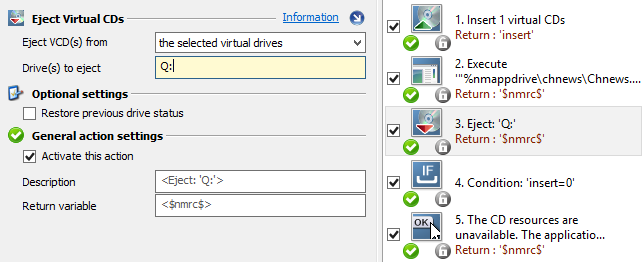
In the action properties, under Eject virtual CD(s) from, we select the selected virtual drives. Under Drive(s) to eject, we specify our virtual drive. Remember to enter a colon with the drive letter.