Scripts are created in the NetMan Center. To open the NetMan Center, double-click on the NetMan Tools shortcut on your Windows desktop. The following description explains how to create a Program Script – that is, a Script that launches a program.
![]() You can also create a Program Script directly in the Collection Editor when you create the Collection that will contain it, but that method is more suitable for use in uncomplicated environments which require only straightforward application publishing. In such cases, you can create the Collection first and then add Scripts to it, either from your existing Scripts or by creating Scripts as you go along. For details on creating Collections and adding Scripts to them, see "Create Collections".
You can also create a Program Script directly in the Collection Editor when you create the Collection that will contain it, but that method is more suitable for use in uncomplicated environments which require only straightforward application publishing. In such cases, you can create the Collection first and then add Scripts to it, either from your existing Scripts or by creating Scripts as you go along. For details on creating Collections and adding Scripts to them, see "Create Collections".
1. Open the Script view: Click on Scripts in the sidebar to open the Scripts view.
2. Select Script type: Click on Program in the sidebar.
3. New: Click on the New button in the ribbon.
4. Enter a name: In the Create a new NetMan script dialog, enter a name for the Script in the Name field and, if desired, a description in the Description field.
![]() Tick the box next to Open the new object in the editor to have the Script automatically opened in the Script Editor. Alternatively, you can open the Script yourself once it has been created.
Tick the box next to Open the new object in the editor to have the Script automatically opened in the Script Editor. Alternatively, you can open the Script yourself once it has been created.
5. Create the Script: Click on the Create button. If you ticked the box next to Open the new object in the editor, the Script Editor now opens automatically with this Script loaded for editing. Otherwise, double-click on the Script to open it in the Script Editor.
6. Configure launch settings: On the Script page of the Script Editor, select the in a session, if local launch not possible option under Settings for launch. This is the default setting. With this setting, the application is launched on the local machine if an installation is found; otherwise, it launches in a session on the Session Host.
7. Open the Program page: Click on Program in the sidebar to open the Program page.
8. Select the executable file: On the Program page, under Program, select the executable file to be run by the script. To do this, you can drag & drop the file into this input field, or click on the Open file button. NetMan Desktop Manager stores the input in a variable if possible:

9. Save Script: Click on Save in the ribbon to save the Script.
![]() Click on Save and close if you want to save the Script and close the Script Editor.
Click on Save and close if you want to save the Script and close the Script Editor.
The Script is now available in NetMan Desktop Manager and can be added to any or all of your Collections. For details on creating Collections and adding Scripts to them, see "Create Collections".
Assign an icon
A default icon is assigned automatically when the Script is created. You can change the icon as follows if desired:
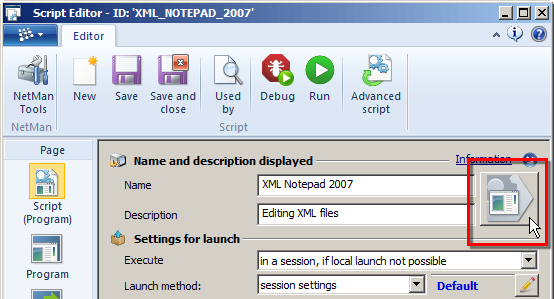
1. Open the Script page.
2. On the Script page, click on the icon button:
3. In the Select a new icon dialog, click on the Import button above the list.
4. In the Windows File Open dialog, select the file that contains the desired icon to import it. If you wish to use the icon that came with the application, the file you need to select here is the application's executable file – or a separate icon file – in the application's installation directory.
5. Once the icons in the selected file have been imported, they are displayed for selection. Select an icon and click on OK to confirm.
The selected icon is now used as the Script icon.
Assigning a category
Categories are a property of Scripts. They are not persistently stored. This means you cannot select a category unless there is already at least one Script in that category. Otherwise you have to create the desired category. Categories for Scripts are created in the Script Editor, on the Script page or Properties page:

To create a new category, simply enter a name for it. To use an existing category, click on the Edit button to the right of the input field. In the Select an existing category dialog, select the desired category.