You can define script-specific session settings for each NetMan script – including, if desired, how and where the script is launched. These script-specific settings overwrite the global defaults. Begin by configuring the launch settings for the script:
1. In the NetMan Center, open the script view.
2. Double-click on a script to open its properties.
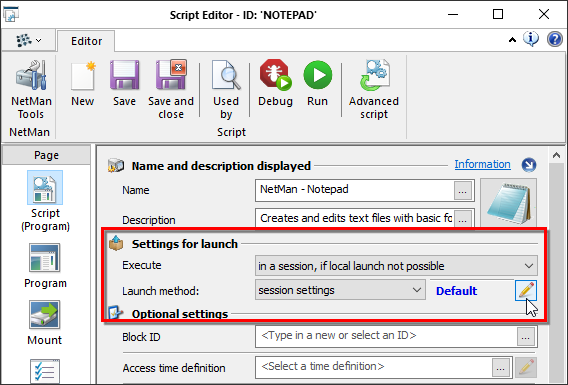
3. On the Script page, next to Launch method select session settings.
![]() The session settings can only be edited if, next to Execute, the in a session or the in a session, if local launch not possible option is selected.
The session settings can only be edited if, next to Execute, the in a session or the in a session, if local launch not possible option is selected.
4. The session settings are initially set to Default (see blue text). To edit the session settings, next to the display of the selected session settings (blue text), click the Edit button:
The session settings are edited in the Launch Rules Editor:
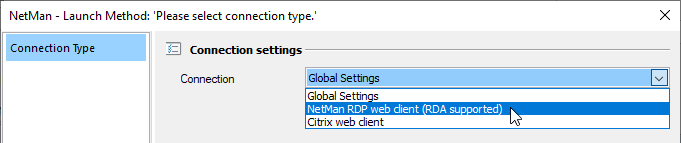
On the Connection type page, define the desired launch method in the Connection field:
Global Settings. The script applies the global settings as defined in the NetMan Settings program.
NetMan RDP web client. The script launches with the NetMan RDP web client, which establishes a connection to the Remote Desktop Session Host.
Citrix web client. The script launches with the Citrix web client, which establishes a connection to the session host.
The Launch Rules editor has a number of pages; which of these are available for configuration depends on which client you select. The following lists show the pages for NetMan RDP web client and Citrix web client:
Launch method NetMan web client:
•View
•RDA
Launch method Citrix Web Client:
•View
•HDX
If you select NetMan RDP web client as launch method, the Launch Rules Editor expands to show the following options:
On this page, select the client to be used and the connection to the session host.
Alternative IP address. The session host is addressed using one of its alternative IP addresses. For the Citrix web client, no alternative IP addresses are available.
![]() You can specify up to four alternative IP addresses for each session host. This must also be configured in the session host's station properties. To do this, open the NetMan Center, activate the station view and double-click on the desired session host. Enter the alternative IP addresses on the IP addresses page of the station properties. For details on creating and editing local drive filter definitions, see "Stations“.
You can specify up to four alternative IP addresses for each session host. This must also be configured in the session host's station properties. To do this, open the NetMan Center, activate the station view and double-click on the desired session host. Enter the alternative IP addresses on the IP addresses page of the station properties. For details on creating and editing local drive filter definitions, see "Stations“.
On this page, you can define load balancing settings for the script that differ from the global settings. The list is processed in the order in which it is shown here, from top to bottom. The buttons at the top of the list let you add session host farms and edit the list:
New. Opens the Select a station group dialog, in which you can specify the session host farms to be used in load-balancing.
Delete. Deletes the selected entry from the list.
Up. Moves the selected entry one position higher in the list.
Down. Moves the selected entry one position lower in the list.
On this page, you can configure script-specific settings for login on the session host.
Login type. Defines the login on the session host. You can choose from the following settings:
•Global Settings. Uses the global settings for the script.
•Use NetMan anonymous users. Uses the NetMan anonymous users for login. Prerequisite for this is the existence of NetMan anonymous user accounts in your system. For details on creating anonymous user accounts, see "Anonymous Users“.
•Define login data here. Script-specific login data for this script are defined here. When you activate this option, additional settings options are shown.
Users. User name that this script will use for the remote desktop session login.
Domain. Login domain for that user.
Password. Password for that user.
On this page, you can configure the display options for the script-specific remote desktop session.
Seamless. Activates the seamless mode:
•Global Settings. Uses the global settings for the script.
•Open session in a window. The session is displayed in a window.
•Use seamless mode if possible. Uses the seamless mode, if that is possible. In seamless mode, the application is launched without any additional window being visible, so that it is said to be "seamlessly" integrated in the user's working environment. The seamless mode is not supported for the Windows shell, the session host console itself, nor for non-Windows operating systems that launch applications using the Web Interface.
Window size. If needed, you can define a fixed window size for the session here:
•Global Settings. Uses the global settings for the script.
•Full screen. The session window is displayed in full-screen mode.
•Size as % of screen size. You can specify a percentage of the full screen to be used for display of the session window.
•640*480
•800*600
•1024*768
•1280*1024
•1600*1200
•User-defined screen resolution. Lets you specify a resolution to be used with this script.
Use all monitors for remote desktop session. If multiple monitors are connected to the client station, NetMan Desktop Manager can use all monitors if desired:
•Global Settings. Uses the global settings for the script.
•Yes. All monitors are used.
•No. Only one monitor is used.
Show connection bar when in full screen mode. Defines whether a 'connection' bar in full-screen mode:
•Global Settings. Uses the global settings for the script.
•Yes. The 'connection' bar is displayed when the full-screen mode is active.
•No. The 'connection' bar is not displayed when the full-screen mode is active.
Colors. Sets the color depth for the session:
•Global Settings. Uses the global settings for the script.
•Colors
•High color (15-bit)
•High color (16-bit)
•True color (24-bit)
•Highest quality (32-bit)
On this page, you can configure which local resources are available in the session opened by this script.
Sound playback. Defines whether audio playback is available in the script-specific session:
•Global Settings. Uses the global settings for the script.
•Play. Audio data can be played.
•Do not play. No audio is played.
Sound recording. Defines whether audio recording is available:
•Record. Sounds can be recorded.
•Do not record. Sounds cannot be recorded.
Keyboard shortcuts. Defines whether keyboard shortcuts are available:
•Use in full-screen mode only. Keyboard shortcuts are available in full-screen mode only.
•On this computer. Keyboard shortcuts are available on the session host.
•On the remote computer. Keyboard shortcuts are available on the client station.
If desired, you can connect the following additional local devices using this editor:
•Printers
•Clipboard
•Smartcards
•Ports
•Local drives
![]() If you wish to use the client drive filter, you need to permit access to local drives permit.
If you wish to use the client drive filter, you need to permit access to local drives permit.
On this page, you can configure performance features for the script-specific remote desktop session:
Transfer rate. Select the bandwidth for your remote desktop session. The bandwidth requirements for a session depend on the options activated. For example, if the desktop background is active, more bandwidth is required than if it is not active. The bandwidth for your session is always user defined. The options in the drop-down list are templates for which you can tick the desired options. You can also define other values here and select the desired options for them as well. If you select Global settings, the global bandwidth settings are applied.
On connection loss. Defines how the open session is handled in the event of connection loss:
•Global Settings. Uses the global settings for the script.
•Reconnect if session is disconnected. If the connection is lost, NetMan Desktop Managerwill attempt to restore the session.
•Do not reconnect if session is disconnected. If the connection is lost, the session is not restored.
On this page, you can configure the NetMan Remote Desktop Acceleration (RDA) feature. The RDA feature increases the RDP transfer rate using intelligent compression up to 25-fold depending on the data transferred:
Activate RDA. Defined whether RDA is used. Global settings uses the global defaults.
Use the ‘quality’ slider to define the quality and speed of the session. Move the slider to adjust quality and speed to your requirements.
On this page, you can configure the use of the NetMan SSL gateway for the script-specific session settings:
SSL gateway. Defines whether the SSL gateway is used:
•Global Settings. Uses the global settings for the script.
•Do not use. The SSL gateway is not used.
•Use. The SSL gateway is used. If you activate this setting, enter the details of the SSL gateway in the following fields.
Server' FQDN. Qualified domain name for the server on which the SSL gateway is installed (example: sslgateway.mydomain.local).
Use proxy. Defines whether a proxy server is used.
Proxy. Name of the proxy server and the HTTPS port (example: myproxy:443)
On this page, you can define a number of settings for the RD protocol itself:
Protocol version. Specifies which version of the RD protocol is used.
Published applications. Defines whether Microsoft RemoteApp or NetMan RemoteApp is used. If you are using seamless mode, it may be necessary to specify the remote app, depending on which operating system you use. The Microsoft RemoteApp is available only for Windows Vista/2008 and later. If you use Windows 2003 or earlier, you must select the NetMan RemoteApp for use with the seamless mode. On the other hand, if you use Windows 2008, for example, and find that the graphic display in seamless mode is unsatisfactory with the NetMan RemoteApp, then you should use the Microsoft RemoteApp.
Run the Trace Monitor. Select this option to have NetMan Desktop Manager will write debugging info when setting up the session. With this option active, H+H the Trace Monitor is launched automatically when the session starts and shows system output.
Launch method: Citrix web client
If you select Citrix web client as launch method, the Launch Rules Editor expands to show the following options:
![]() In the following we show the dialog pages that differ from those shown for the NetMan RDP web client. Pages not shown here are either the same as the corresponding NetMan web client pages or are not available for the Citrix web client.
In the following we show the dialog pages that differ from those shown for the NetMan RDP web client. Pages not shown here are either the same as the corresponding NetMan web client pages or are not available for the Citrix web client.
Login type. Defines the login on the session host. You can choose from the following settings:
•Global Settings. Uses the global settings for the script.
•Use NetMan anonymous users. Uses the NetMan anonymous users for login. Prerequisite for this is the existence of NetMan anonymous user accounts in your system. For details on creating anonymous user accounts, see "Anonymous Users“.
•Uses Citrix anonymous users for login. Uses Citrix anonymous users for login. Prerequisite for this is the existence of Citrix anonymous user accounts in your system. For details on creating Citrix anonymous users, please refer to the Citrix documentation.
•Define login data here. Script-specific login data for this script are defined here. When you activate this option, additional settings options are shown.
Users. User name that this script will use for the remote desktop session login.
Domain. Login domain for that user.
Password. Password for that user.
XenApp host/farm. On this page, you can configure the login on a XenApp server or a XenApp server farm. In the Server field, enter the name of the host name or the farm. In the Protocol field, select the protocol to be used for login. In the XML port field, enter the XML port for the XenApp Hosts.
On this page, you can configure the connection of local resources over Citrix web client in the session:
Sound playback. Defines whether audio playback is available in the script-specific session:
•Global Settings. Uses the global settings for the script.
•Do not play. The audio playback function is not available.
•Low quality. For audio playback in low quality.
•Medium quality. For audio playback in medium quality.
•High quality. For high-quality audio playback.
![]() Which quality levels are available depends on the settings in the Citrix web client.
Which quality levels are available depends on the settings in the Citrix web client.
Keyboard shortcuts. Defines whether keyboard shortcuts are available:
•Use in full-screen mode only. Keyboard shortcuts are available in full-screen mode only.
•On this computer. Keyboard shortcuts are available on the session host.
•On the remote computer. Keyboard shortcuts are available on the client station.
Screen prints in sessions. Defines whether the PrintScreen command is available.
Printer. Defines whether local printers are connected.
Drives. Defines whether local drives are connected.
Program. Defines whether local ports are connected.
Encryption:
•Global settings. The global settings are applied.
•Basic. Basic encryption.
•128-bit for login only. The login process uses a 128-bit encryption process.
•40-bit. 40-bit encryption.
•56-bit. 56-bit encryption.
•128-bit. 128-bit encryption.
Other options available for changing the default settings:
Compression. Compresses data for faster transfer.
Bitmap cache. Saves bitmaps for faster data transfer.
Desktop toolbar. The Desktop toolbar is displayed.
Session reliability. Activates Citrix Session Reliability feature.
The Citrix SpeedScreen or HDX technology improves the display and performance in sessions. The following options are available for changing the default settings:
•Local text echo
•Mouse click feedback
•Buffer mouse events and keystrokes
For details on HDX technology, please refer to the Citrix documentation.
Use alternate address for firewall connection. Uses an alternative IP address for access through a firewall.
Proxy:
•Global settings. The global settings are applied.
•Use proxy address of web server. Uses the proxy address registered for the web server.
•None (direct connection). No proxy server is used.
•SOCKS. Uses the SOCKS protocol.
•Secure (HTTPS). Uses HTTPS.